
Background
Zotero is an open source, free, bibliographic management system created by The Roy Rosenzweig Center for History and the New Media (RRCHNM) at George Mason University whose purpose is to democratize history with new technology and tools. The RRCHNM also created the open-source browser, Firefox (which, because it is open source, should ONLY be downloaded from the Mozilla Foundation website!).
Why We Use Zotero
Zotero is one of the most useful tools you can have to make research papers. It is an Open Source, FREE tool to make citations and bibliographies in ANY STYLE. With Zotero you can:
- keep track of multiple research projects,
- create bibliographies in many different styles,
- create citations, and
- automatically create Works Cited and Bibliographies for papers
This is not all Zotero can do, but it is a good start!!
Here’s the basics from GSU Librarian and Zotero Specialist, Jason Puckett:
If you want to watch the entire WebEx Seminar Given by Jason Puckett, Click HERE.
Downloading Zotero
In order to use Zotero, you must download two components of the program:
- Zotero Stand-Alone (this lives on your computer)
- Zotero Connector (this lives on your browser.)
These are the step-by-step instructions to downloading Zotero into any computer.
Step 1: Check Your Computer & Browser
Zotero can be downloaded into the following computers:
✅ Apple,
✅ Windows (including Surface tablets),
✅ Linux.
Zotero will not work on:
❌ Chromebooks
❌ Mobile Devices, or
❌ iPads.
If you need to, you can use any lab computer at the college to run Zotero. Zotero has been white-listed by the IT department for installation on GSU campus computers.
When you try to install Zotero on a GSU campus computer, you will get a dialogue box asking for an administrative password. Simply click the “X” to close the dialogue box to keep installing Zotero. |
You can use Zotero with Safari, Chrome, and Firefox browsers. It WILL NOT WORK with Microsoft Explorer or Edge.
Step 2: Close MS Word
Zotero will install a connector into MS Word. Therefore, in order for this connector to install, you must close MS Word before installing Zotero.
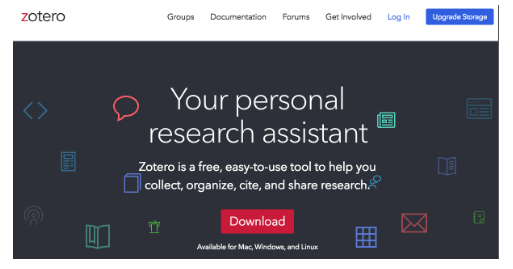
Step 3: Go to Zotero Website
The address is: https://www.zotero.org
Step 4: Install Zotero for Windows, Mac, or Linux
On the Zotero website, click on the scary-looking red “Download” button.
Zotero will automatically prompt you to download the proper version for your computer. If you have a Windows machine, it will prompt you to download Zotero for Windows. If you have a Mac, it will prompt you to download Zotero for Mac, etc. Zotero will also automatically prompt you to download the correct connector for the browser you are currently using.
REMEMBER: ZOTERO DOES NOT WORK WITH MICROSOFT EDGE OR INTERNET EXPLORER. IF YOU HAVE DIFFICULTY AT THIS POINT, PLEASE MAKE SURE YOU ARE NOT USING MICROSOFT EDGE OR MICROSOFT EXPLORER BROWSERS.
Step 5: Install Zotero for Mac, Windows, or Linux
Click the blue “Download” button. Zotero should download quickly (it usually downloads in 90 seconds or less).
|
If you are on a GSU campus computer, and you get a dialogue box asking for an administrator’s password: Click the “x” to close the box. |
Keep hitting “Install” until the Zotero has installed successfully.
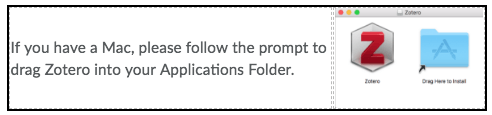
Often, after installing, Zotero will open immediately.
Step 6: Go Back to the Zotero.org Website to Download Browser Connector
The browser connector works with Safari, Chrome, and Firefox. If you can’t get the connector to work, or if you have difficulties with this step, please double-check to make sure you are using one of the three browsers that works with Zotero. If you are not using one of those three browsers, please click on (or download) a compatible browser before attempting to install the Zotero Browser Connector.
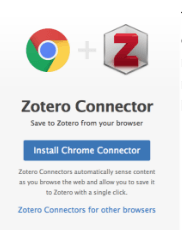
YOU MUST HAVE BOTH ZOTERO AND THE ZOTERO CONNECTOR!
Resources
Library Guide: How to Install Zotero (YouTube)
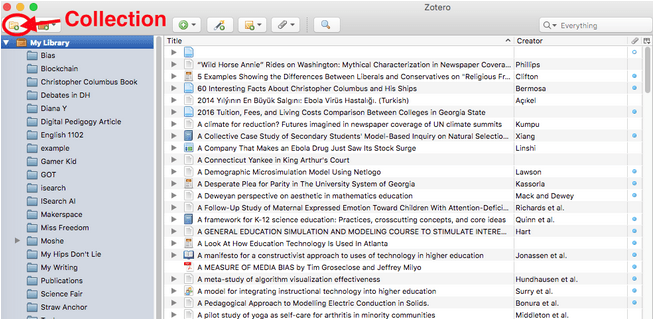
What is a “Collection”?
A “Collection” in Zotero is a folder you create in Zotero to associate with your research project. It is very easy to create a Collection. In the Zotero Application on your Computer, look for a small folder icon with a green plus sign, and click the file icon:
Zotero will then prompt you to name your collection. For the purpose of your first Zotero activity, please name your first collection EXAMPLE:
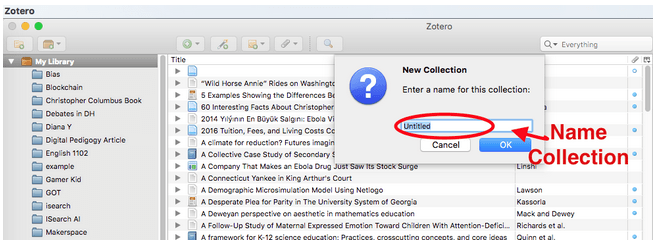
Once you have created your collection, Zotero will make a folder with your project or research name (in this case, you should see a folder named “EXAMPLE.”)
Populating a Collection with Research Sources
Now that you have created an EXAMPLE collection, you are ready to begin populating your collection with sources. Usually this occurs over time as you are research a topic, but because we are learning, we will be populating the EXAMPLE collection with a large number of sources using the GSU Library to practice.
Here are the step-by-step instructions:
- Make sure the Zotero App is open on your computer.
- Click on the EXAMPLE collection to highlight it.
- Open the Browser where you have installed the Zotero Connector. You should see a small icon of a page, or an icon with a Z on it next to your Browser Toolbar.
- If you do not have the Zotero Connector Installed, please go to Zotero.org and click “Install Connector.” If you are using Chrome, you will see the button like this:
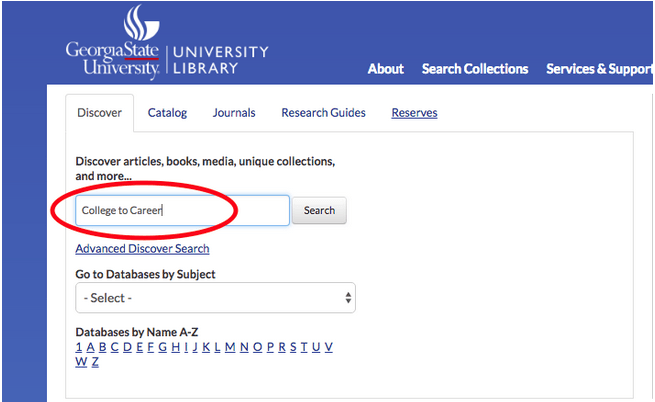
- Go to the GSU Library.
- Enter the words, “College to Career” in the search bar at the GSU Library.
 6. A new window with your results should open up. After it opens, click the Zotero folder next to your toolbar (NOT the one in the blue stripe!!!):

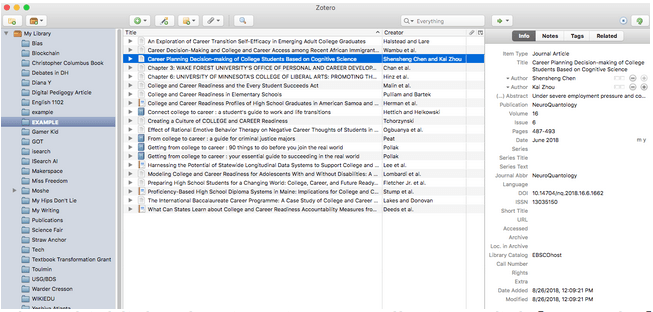
7. A window will pop up with a list of the selections on the page. As you can see, the same titles exist in the pop up and in the search results. Now click “select all” and “OK” to add all the selections to your Zotero Collection EXAMPLE:

8. Minimize your browser window to see the open Zotero Application on your computer. You should see that the EXAMPLE collection has been populated with your selections from the library (be patient, this may take a minute to happen).

Use a Collection to Make a Simple Bibliography
Zotero can be used to create a simple bibliography once you have entered a number of sources in a collection. Please follow the directions to make your first Zotero Bibliography!
- Open the Zotero Application on computer.
- Click on EXAMPLE to open the collection.
- Click on any source in the collection to highlight it.
- After you have highlighted an item in your collection, click [Control A] on PC or [Command A] on Apple to highlight the whole list.
- Right Click and choose “Create Bibliography from Items.”
- Now open a new document in MS Word.
- Type “Works Cited” and center it at the top of the page.
- On a new line, right click and paste (if you are on a PC, chose the first option “Keep Source Formatting”).
- You should have a simple bibliography that has been formatted correctly: double spaced, alphabetical order, hanging indent, in MLA 8th edition style.
Using Zotero Outside of Google Scholar or a Library
A Word About SourcesThere are two types of data used to make sources: “structured” and “unstructured.” Structured Data SourcesSources made from “structured” data are sources created with the EBSCO file system. The data is “structured” in the same way, and Zotero knows exactly where to find every detail. When you use structured data sources in Zotero, all of your source data is complete, and you have less work to do checking to make sure Zotero has all the information to make citations and bibliographies. Structured Data Sources may be found in two principle locations: the GSU library and Google Scholar. Unstructured Data SourcesSometimes you need information from sources that are not in the library or on Google Scholar. For example, you may need information that is time sensitive from a news website. When you need that type of information, you will probably go on the web to search for source that are “unstructured data sources” because information about the title of the article, date, author, and website name may be located in a place Zotero doesn’t recognize. Sources made from “unstructured” data, are sources like websites, magazines, and books that are located on the web. Any source that does not have a structured EBSCO entry is an “unstructured” data source. Unstructured Data Sources are easy to use with Zotero, but you need to do a little extra work to locate and enter information so that Zotero can use it to make accurate Citations and Bibliographic references. You are responsible to add this information. Don’t be lazy, or Zotero can’t help you get your sources right! |
Zotero Tabs
In the Zotero Application on your computer, open the EXAMPLE collection.
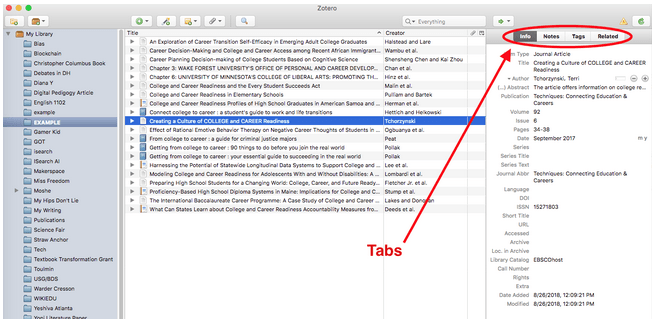
The tabs are labled “Info,” “Notes,” “Tags” and “Related.” Each tab is helpful for research.

Adding Information to the Info Tab
To add additional information to the Info tab, click on the source, then check and see how much information you can fill in.
Click on the blank (or incomplete) boxes of information and fill them in. For example, if I gather information from a website, I might need to find the author, date the article was produced, and the name of the website if Zotero is unable to locate that information from the unstructured data.
What Kind of Sources Work in Zotero?
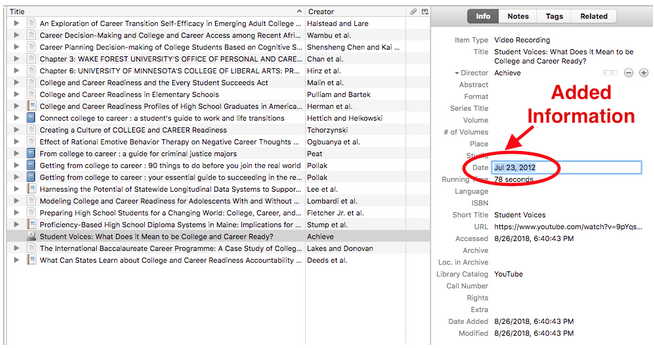
Zotero is surprisingly adept at citing almost anything you find on the web. You just need to make sure that the correct information is gathered about each source. For example, if you use a YouTube video, you will gather information about the director and/or producer of the film. If you gather information about a piece of art, you may need information about the artist and medium. That information is added to the “INFO” tab in Zotero.
If you added something and forgot to get the details, it is not a problem. Simply click on the source, and Zotero will open the browser window for the source. You can then gather any information you need!
How to Add Individual Sources in Zotero
In your browser, search for information. Once results come up, you must choose one of the sources in order to upload it into Zotero. (Zotero only makes file folders for structured data.)
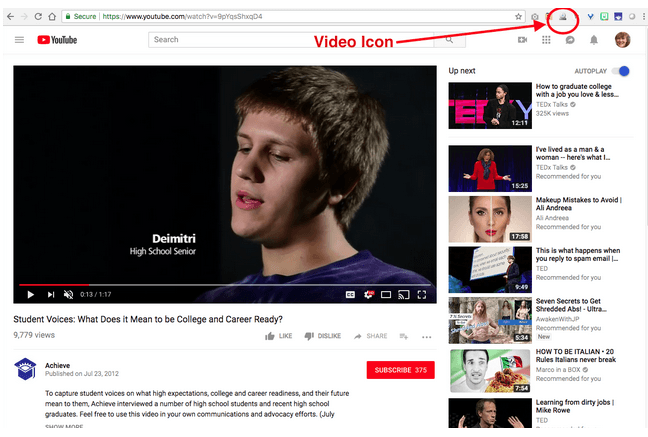
For example, here is a search for a “YouTube: College to Career.” Zotero, through the Zotero Connector to my Browser, gives me an icon to upload the source as a video reference:
When you use Zotero for sources outside the library or Google Scholar, you may need to insert specifics into the Zotero “Info” section.
Adding Items to Zotero that are not Online
Let’s say you want to do an interview. If you want to add it to Zotero, click on the green PLUS BUTTON and choose the type of material from the list. When you click on the source type, you can then add all the information you need to add for Zotero to create citations and bibliographic references for your research.

You can easily add books to Zotero that are not in the library by going to Amazon.com and adding the book there.
Using Zotero in MS Word
The most important use of Zotero is through the Zotero Connector for Microsoft Word. Using the integration for Zotero, you can easily cite your sources and build a bibliography for your research paper using Zotero.
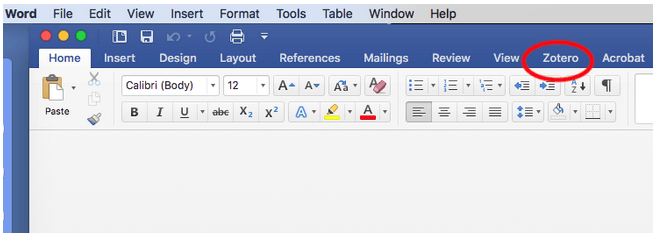
Once you have a populated collection in Zotero, you are ready to use it in Microsoft word. Open Microsoft Word in your computer. At the top of the page, you should see a tab labeled “Zotero.”
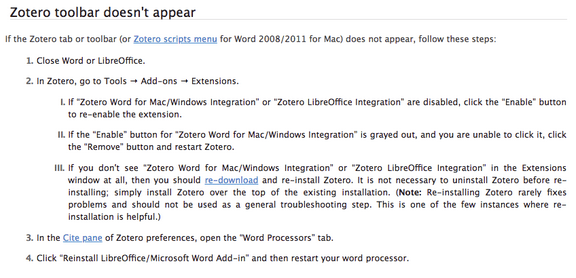
If you don’t see the tab, it may be that you installed Zotero while MS Word was Open. Please shut down word and try reinstalling Zotero.
If you are on an older Apple Computer, you may find the answer to the missing tab here:
To play with Zotero in Word, please download the following short word document:
An Example Word Document to Play with Zotero
In the document, you will find instructions for using Zotero in Word. Take a moment to play with it!
Creating a 10-Item Annotated Bibliography Using Zotero
What is an Annotated Bibliography?
When you create a large research project, it is easy to get lost in the details. Sometimes you forget which source you were planning to use, or you forget the source’s importance to your project. It is important to keep organized notes to keep your project on track.
The Annotated Bibliography is a formal way to keep track of research sources, or to share those research sources with other scholars. Often you are assigned an Annotated Bibliography as part of a larger research project.
IMPORTANT!NEVER use annotations in the Works Cited portion of your paper. Annotated Bibliographies are only for research use. Works Cited pages DO NOT INCLUDE annotations, ever. (Never ever. Never ever ever ever. . . Just don’t do it, OK?) |
The Importance of Formatting in Annotated Bibliographies
Because Annotated Bibliographies are for research and between researchers, it is important to use the correct formatting so that you and others can keep the information straight. If your Annotated Bibliography is not formatted correctly, your grade will suffer. It has to be PERFECT or it is useless.
FORMATTING COUNTS!
In the Annotated Bibliography, sources are in hanging indent. Annotations are indented on the first line beneath the source, and the entire paragraph of annotation is indented by .5 inch on the left.
For this assignment you will be creating two short (1-2 sentence) paragraphs beneath the source. The first paragraph is a summary of the source. The second paragraph tells how useful the source is to your research topic.
This is how you should begin:
- Establish a new collection for your research project.
- Populate the collection with at least 10 sources related to “Careers for (add your own) majors.”
- Once you have at least 10 sources, create a simple bibliography with Zotero.
- Open a new MS Word document, and type and center “Annotated Bibiliography” at the top of the page.
- Immediately below your title, paste the 10 item bibliography.
Create a Template
- Place your cursor immediately after the first source citation in your simple bibliography. Hit “enter” to go to a new line.
- On that line, type (or copy and paste from here): The first paragraph is a summary of the source. It is 1-2 sentences long.
- Now hit “enter” again and go to a new line. On that line type (or copy and paste from here): The second paragraph tells how you would use this source in your research. It should also be 1-2 sentences long.
- Now we will format those two two-sentence paragraphs to make the template.
- Highlight both short paragraphs.
- Open the paragraph formatting table (On PC, go to the HOME Tab, and click on the small square at the corner of the “Paragraph” tab. On Mac, go to the top of the page until you see “format” appear. Under format, choose “Paragraph.”)
In the opened Format Paragraph Box under “Indentation,” change Special to “First Line Indent.”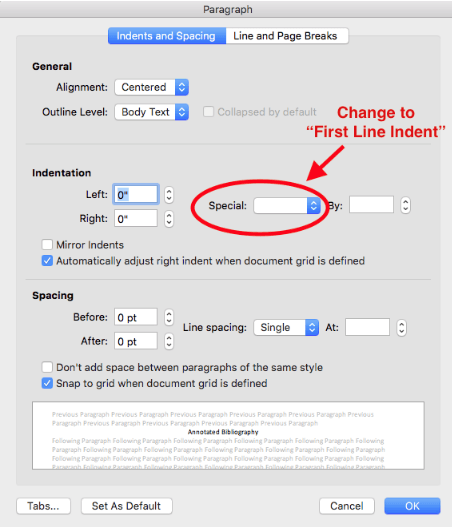 8. After the two short paragraphs move over, go to the HOME tab again, and “Increase Indent” by using the small arrow on the right.

9. When you are done, the two short paragraphs should be formatted with the first-line indented, and the entire paragraph moved to the right by five spaces.
10. Now highlight both paragraphs one again and right-click to copy.
11. After you have copied the paragraphs, go to the end of the next source and hit “enter.”
12. Directly below that source, click control/command-V to paste under that source.
13. Eliminate the extra space between the end of the template paragraphs and the next source.
14. Now, go to the end of the next source, click “enter,” and paste the paragraphs. Omit the extra space.
15. Continue until all sources have formatted template paragraphs beneath.
You have now created a template to complete the annotated bibliography. All you have to do to finish your annotated bibliography is highlight the first paragraph under the source and type your summary of the source there. Then, highlight the second paragraph and type how this source is useful to your research.
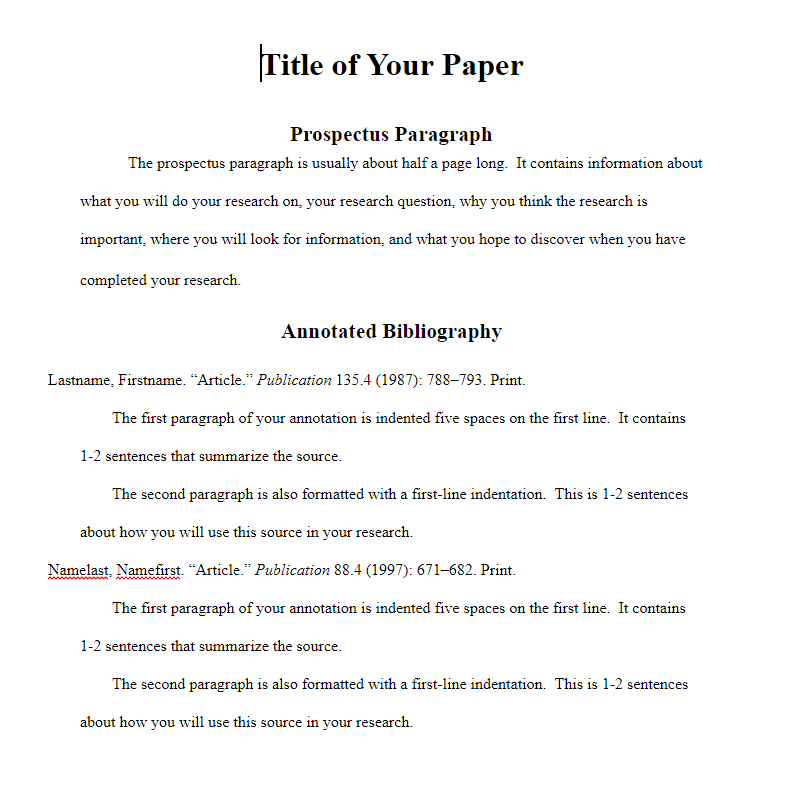
This is an example of how the Annotated Bibliography should look:
Complete the Annotations, and submit to the Annotated Bibliography Dropbox, and Post to Portfolium.
Leave a comment