Often times when we are in class taking notes, we are using Microsoft Word. However, because we aren’t familiar with all the aspects of MS Word, we often don’t take advantage of this powerful tool.
One example of how note-taking can become a lot more useful is to use MS Word’s “Notebook Layout” view. It is very easy to do and can increase your ability to take good notes and to study from those notes more productively.
When you open a new document in Word, go to the very top of your page, and click “view.” Choose “Notebook Layout.”
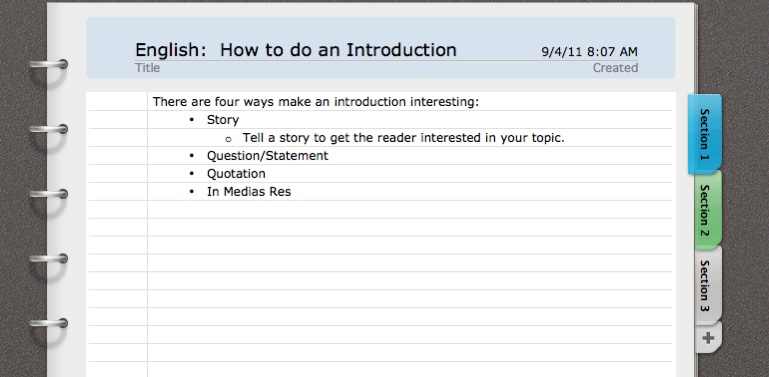
When you do, you will get a nice representation of a notebook page with a top margin marked “Title,” and the date and time already added. You will also see virtual “dividers” so you can organize your notes.
When you begin typing on this layout view, you will notice that your text is preceded by a bullet. Type in a subject like “There are four ways to begin a paragraph.” Hit the return, and then hit the tab. The next level of text will also be bulleted automatically, but you will notice that the original subject’s bullet has become an arrow that you can click to open and close the minor points under the subject.
Now put type four points with a return under each one, for example “Story,” “Question/Statement,” “Quotation,” and “In Medias Res.”
Now that you have this list, go back to “Story,” hit an additional return, then another tab, and type “Tell a story to get the reader interested.”
You will see that not only is the next level bulleted, but the bullet before “story” has also become an arrow where you can collapse text.
How is does this help you? Well, if you are following a lecturer who first outlines the points they want to cover, then fills in the outline (like many college professors do), you can easily follow them by using Word’s notebook layout. When it comes to studying, you can collapse points you want to hide from yourself, quiz yourself, and then reveal the answers in your own notes.
On the home menu you can also choose “scribble” to draw a picture, you can insert a table, and you can rearrange your notes easily. You can also set up an alert in “Outlook Tasks” to add something to your calendar and alert you, for example “Quiz in English.”
Because there are tabs, you can take notes for more than one class in the layout view. In the “appearance” menu, you can play with how your notes look, you can choose different colored tabs for the dividers, you can name the dividers, and you can change the page numbers.
The third section allows you to add audio notes to your page if, for example, you want to record your algebra teacher’s explanation of the equation you just can’t crack.
I highly recommend playing with “notebook layout” before you get to class, as you want to implement as many features as possible when you get to class.
(Make sure you post your great notes on the class WIKI as well!!)
Dr K
