Week7 Personas

Homework — Assignment 7

If your case study involves creating personas, you might develop a questionnaire to help you identify and sort different kinds of users. Or you might imagine a couple of different kinds of users and then develop a questionnaire to verify or deny your imaginings. If you go this route, share your plans and your draft questionnaire(s) with the class.

If you aren’t yet ready to directly engage your case study, here’s an alternative assignment.

AI Persona Experiment

A. Why do we need to know about users?

According to Observing the User Experience, the author believes that

  1. The users we actually have are different from those we imagined having
  2. Our users are not all the same.

So personas, correctly developed and used, are the most valuable to have before we start developing anything: a product or service, a redesign, a new feature set, or a new identity. They can also help in introducing an existing product or service to a new market.


B What is a persona?

According to Personas- A Simple Introduction, personas are fictional characters, that we create based on our research to represent the different user types that might use our service, product, site, or brand in a similar way.

As described in 2005 by designer Kim Goodwin, “A persona is a user archetype you can use to help guide decisions about product features, navigation, interactions, and even visual design.” This “archetype” is not a real person, but a synthesis of facts and observations about real users that lead to a memorable character.


C. Why do we need a persona?

  1. By creating these characters and taking them through scenarios, UX designers and stakeholders can gain a sense of familiarity and empathy with the users. Creating personas can help us understand our users’ needs, experiences, behavior, and goals. It can help us step out of ourselves, and help us recognize that different people have different needs and expectations.
  2. It can also help us identify with the user we are designing for.
  3. Personas make the design task at hand less complex, they guide our ideation process, and they can help us to achieve the goal of creating a good user experience for our target user group. Few companies these days develop anything without identifying a target market, and many also create market segmentations. However, because we can identify a market segment doesn’t mean we know how to design for the people in it. Creating personas can help us have good design as great design comes from understanding our user‘s behaviors. Personas, unlike market segments, represent goals and behavior patterns, not demographic attributes or job responsibilities.
  4. Persona can assist design in serving as a shared reference point. Over time, they can even function as an efficient shorthand. Rather than describing a feature with long sentences, we can say “it’s for ***” . “***” represents a shared understanding of a class of user experience issues that are important to the success of the product.


D. How to do it

  1. Research for Personas

1). Internal interviews.

If we work as a UX designer in a company, we can conduct a few short one-on-one interviews with stakeholders, experts, the people who work directly with the product like salespeople, support staff, market researchers, technical sales consultants and trainers.

What distinct types of users have they observed, if any?

What impacts do they see various user types having on their work or on the business?

2). Research with participants

Most of the data we draw upon on create personas should come from qualitative research with individual users or potential users. Structure the interviews or field visits around people’s entire experience with our product or service, not around specific tasks. In recruiting participants, we should represent the entire range of our target user base. While interviewing, keep a list of good quotations, problems, and anecdotes.

3). Market research review.

In a company, sales and marketing often have detailed demographic profiles and market research that can give our big picture breakdowns of our audience. If we have a market segmentation, especially one that draws upon usage data or other behavioral data, it’s worth consulting. But don’t just make personas that reinforce market segments.

4). Usage data and customer feedback review.

Consult customer forums or community sites by the company or others can support systems for frequent user questions and problems, which can provide supporting data for making this information part of our personas.

We can also create provisional personas.

  1. Creating Personas

Analyze the Data

What do the people have in common?

Are there problems that seem to crop up frequently?

Are there shared aspirations?

Then make a list of the important ways in which users vary.

Look for patterns in our interviews and usage data and consider what aspects of our users tend to drive their goals and needs. First, find attributes that matter to the selection and use of our product. Then identify those that distinguish different subsets of users from each other.

  1. Prioritize attributes and patterns

From our data, we will likely see a number of patterns that could turn into persona. We need to decide which attributes are the most important to us. If we have the time, review the factors with stakeholder experts outside of the research team. If we don’t have the time, use market research reviews and usage data reports to guide an initial cut.

  1. Define our personas

We need to draw upon the personal details and anecdotes we observed in our research to synthesize realistic people from the clusters of attributes.

Don’t be afraid to go with our gut in creating the personas and telling their stories.

In some cases, adding details is as straightforward as creating a specific “fact” that falls within an attribute range we have defined.

1). Don’t create wacky idiosyncrasies. Strange features tend to distract from the important attributes. If there are attributes that all personas have in equal measure, we don’t make our persona an Olympic-class ice skater. If there are attributes that all personas have in equal measure, we don’t need to describe them in each persona. We need enough detail for realistic, memorable personas, but don’t load them up with information that is not relevant.

2). Flesh out the rest of the attributes, using materials gathered from our interviews. We may want to write a little story about it, incorporating details drawn from similar users.

3). Complete the persona by creating a story tying all the attributes together, highlighting the problems and anxieties.

NB:

we should not have too many personas. One good rule of thumb is to have one persona per main organizational role or customer type. We present multiple personas, and prepare a one-page or one-slide explanation of how the personas represent different combinations of attributes.


To get the full benefit from the process, the personas need to remain in use.

They should be documented, shared, updated, and used in everyday product development.


  1. Prioritize

Not all personas are equally important, so the group should prioritize them.

  1. Document

The document we create must reflect the needs and concerns of its audience.

A basic persona contains the following elements:

1). The name of the persona

2). A description of the person’s needs and aspirations for the product or service

3). The persona’s immediate goals in using that product or service

4). His or her abilities and experience

5). His or her perspective on the task and the product.

6). A portrait is the final element. We can pick a picture that is fun and can be a good way to wrap up a long brainstorming session. Find a source of stock photos (We can get one from a stock photo website such as https://www.gettyimages.com/ )

NB:

Don’t choose any images that might trigger negative reactions or be controversial.

Never use pictures or names of people we know when creating a persona.

Or, for that matter, never base a persona on someone we know personally. It’s distracting and restrictive when it is time to change the persona.

  1. Share

Summarize the personas in an easily usable form. In a company, we can create a one-page snapshot version of our personas, introduce them in an introduction meeting, create posters with the picture and key attributes of the user, and tack them to walls.

  1. Develop with Personas

1). Personas can serve as bases for recruiting screeners. Or we can think about how features work for the various personas

2). We can get people thinking in terms of personas by using the persona names in our documentation and specs.

3). Use personas to evaluate our competitors. Use a competitor’s product and try to determine which persona it’s creating for. Try to identify how our personas would use it. Whom would the sites be attractive to? Why? Where do they succeed? Where do they fail?

  1. Regularly Update

Personas should be sanity-checked and updated on a regular basis.

  1. Build Characters, Not Stereotypes

1). Don’t give our personas too catchy names which will make the users have different associations.

While personas are fictional characters, they should be sympathetic enough to unite a team in designing for them. Associate our personas with cliches and stereotypes undercuts this function.

For example, it may seem like a good idea to give our personas catchy names like “Jeff Toolbelt” or “Dutiful Doris.” It’s true that these types of names are evocative and memorable. But they also invoke people’s preexisting associations with certain phrases and images. Since we are not a mind reader, we cannot predict what those associations will be. For all we know, the associations might be negative, disrupting any empathy we are trying to build. And worse, since people will have different associations our catchy names might actually create disagreement instead of unifying people.

2). Don’t find photographs that look like models in generic stock-photo poses.

We should try to find photos that look like ordinary people going about their lives. It’s better to use an illustration than a photograph that looks fake. That’s why we gave Jeff and Doris names that sound like real people and gave Jeff a photograph that looks like a snapshot taken by a friend.


  1. Connect Personas to Action

1). Rewrite our personas around needs.

2). Use personas to guide team design brainstorms.

3). Link together personas with design scenarios to start organizing and prioritizing that brainstormed functionality. However, be careful not to introduce design requirements or proposed functionality into the persona itself. The purpose of the persona is to inspire multiple design concepts, not document one or two.

  1. Don’t let Personas stand alone.

Personas should be used alongside scenarios, experience models, task analyses, and traditional written reports.


EMy personas for the pick-up Chinese food ordering service website(created by Claude.ai)

  1. Create a persona with a name, needs, goals and pain points for a pick-up Chinese food ordering service website in Atlanta for 1 Chinese client (19-year-old female freshman who is a picky eater)

https://www.gettyimages.com/detail/photo/young-asian-woman-using-her-laptop-in-a-cafe-royalty-free-image/1193021447?adppopup=true

Name: Meimei

Demographics:

19 years old

Female

Chinese international student

Freshman at Georgia Tech

Lives in campus dorm

Needs:

Quick and convenient meals that fit into her busy student schedule

Consistent, familiar flavors that appeal to her picky preferences

Easy ordering and fast pick-up options close to campus

Goals:

Find 2-3 go-to dishes she enjoys and can reliably reorder

Avoid veggies, spices, or ingredients that are too unfamiliar

Stick to affordable menu items that are filling but don’t break her budget

Pain points:

Feeling overwhelmed by large menus full of items she won’t try

Being unable to customize orders to her taste (e.g. no veggies)

Ordering something new that arrives but is unappetizing to her


  1. Create a persona with a name, needs, goals, and pain points for a pick-up Chinese food ordering service website in Atlanta for 1 Chinese client (a 25-year-old male worker who wants affordable dishes)

https://www.gettyimages.com/search/2/image?family=creative&phrase=a%2025%20Chinese%20worker

Name Da Lee

Demographics:

25 years old

Male

Works as an accountant

Lives alone in an apartment complex

Needs:

Budget-friendly meal options under $15

Filling plates that satisfy hunger on a tight budget

Easy access to coupons and discounted combo plates

Goals:

Find affordable go-to orders for quick dinners after work

Maximize quantities and nutrients per dollar spent

Discover new low-cost dishes by experimenting with the menu

Pain points:

Menu items that seem overpriced for portion size

Missing out on deals or coupons due to disorganization

Treating himself to pricier plates once in a while but feeling guilty about it


  1. Create a persona with a name, needs, goals, and pain points for a pick-up Chinese food ordering service website in Atlanta for 1 American female client who loves to eat sweet and fried Chinese food.

https://www.gettyimages.com/photos/a-32-american-worker?assettype=image&alloweduse=availableforalluses&family=creative&phrase=a%2032%20American%20worker&sort=mostpopular

Name: Amy Thompson

Demographics:

32 years old

Female

Works as a marketing manager

Lives alone downtown

Needs:

Quick access to Americanized Chinese dishes

Convenient ordering of her fried favorites

Options for sugary desserts and appetizers

Goals:

Satisfy cravings for bold, intense flavors

Discover new sweet, fried, or saucy menu items to try

Have meals delivered fast so she can relax after work

Pain Points:

Waiting a long time for delivery of indulgent cravings

Missing out on desserts or add-ons due to minimal menu browsing

Ordering dishes that are too spicy or intense for her comfort level


Useful Links:

  1. https://www.interaction-design.org/literature/article/personas-why-and-how-you-should-use-them
  2. https://www.gettyimages.com/
  3. https://claude.ai/chats


Week6 — Inside Out Surveys and Questionnaires

Homework — Assignment 6   Inside Out Surveys and Questionnaires

Read the excerpts from the Resources. Find some other advice about designing and administering questionnaires in whatever format you like, text, video, interview an expert.

Deliverable(s)

Blog what you learned about designing and administering questionnaires. If you have personal experience, please feel free to share that with us as well. If you have some initial questionnaire questions for your final project, share them with us.


  • A. What I have learned about surveys & designing and administering questionnaires.


  1. What is a survey?

According to Observing the User Experience, a survey is a set of questions that allows a large group of people to describe themselves, their interests, and their preferences in a structured way. Using statistical tools on the results, UX designers can reveal broad characteristics about their users and extract interesting patterns. But, if UX designers do not design the survey carefully, they can ask the wrong people the wrong questions, producing results that are inaccurate, inconclusive, or even deceptive. Web-based surveys are especially vulnerable because, lacking any direct contact with respondents themselves, their accuracy relies on their ability and willingness to honestly report their opinions. Without direct contact (whether through in-person visits or analysis of behavioral data), UX designers cannot tell whether respondents’ descriptions of themselves or what kind of service they really use.


  1. What is a questionnaire

A questionnaire is a research tool consisting of a series of questions and other prompts for the purpose of gathering information from respondents. Questionnaires are commonly used in fields like market research, social science research, opinion polling, and customer satisfaction surveys. They allow researchers and organizations to collect data from a sample of people in a structured way.


  1. Setting a Survey schedule for my UX final project
Date Activity
3.11-3.18 1)    Determine test audience and goals. Finish redesigning a Chinese food ordering website.
3.11-3.18 2)    Start writing all the possible questions.
3.19-3.25 3)    Finish writing questions and review with a few people.

4)    Revise or rewrite as necessary. Write a report draft. Choose an online survey provider.

3.19-3.25 5)    Set up my survey using the service I chose. Pilot test, using both collection and tabulation software. Write report based on pilot test results.
3.19-3.25 6)    Rewrite questions based on pilot test feedback; review with a few people.
3.19-3.25 7)    Finish preparing online questions. Test survey for functionality under multiple conditions.
3.26-4.1 8)    Field the survey. When done, remove the survey site immediately and shut down data collection.
4.9-4.15 9)    Begin analysis.
4.9-4.15 10) Complete analysis. Begin report.
4.22 11) Complete report. Present to others, discuss, and note directions for further research.


  1. Brainstorm Our Questions
  • Keep the survey goals in mind and brainstorm every possible question we can think of that we want to answer with the survey.
  • We can ask our friends or classmates for their opinions about the possible questions. And then share them our lists so they are not biased by our ideas. After that, we can see if any additional questions should be added to our initial lists.


  • Two different survey goals are descriptive goals and explanatory goals.
  • 1). Descriptive goals: aim to profile the audience in terms of personal characteristics like what they own or what they want. We do not try to understand how any of the characteristics affect each other.
  • 2). Explanatory goals: explain people’s beliefs and behaviors by discovering relationships between their answers. For example, a descriptive survey would seek to know which features people use and what their average incomes are, whereas an explanatory survey would try to explain how the size of their income affects the features they prefer. Explanatory goals aim to find inherent relationships between characteristics.


  • There are mainly 3 categories of survey questions.
  • 1)Characteristic questions:

a). Demographic questions. These questions are about who the respondents are. Who is he/she? How old are they?  What do they do for a living? How educated are they?

b). Technological questions.   These questions ask about their digital technology setup and experience. What kind of mobile phone do they own? What is his/her physical& software environment like?

  • 2). Behavior questions: outline how someone behaves.

a). Technology use. These questions ask users how they use the technologies they care about. How often are they online every week? What kinds of things do they use their cellphones for? What kind of computer experience do they have?

b). Usage. What product features do they use? How often do they use them? What are the reasons they come to the site? How long have they been using it?

c). Competitive. What other sites do they visit? How often and how long have they been using them? What features do they use?

  • 3). Attitudinal questions: inquire into what users want and believe.

a). Satisfaction. Do they like the product? Does it do what they had expected? Are they able to do what they want with it?

b). Preference. What do they find most compelling about the product? What do they consider unnecessary or distracting?

c). Desire. What do they want? What features do they feel are lacking?


  1. Write the Questions.

The close-ended questions provide the respondents with limited answers they must choose from. They can’t air their opinion the way they want, and their response is minimal.

On the other hand, open-ended questions allow the participants to respond as they wish, no holds barred. They are given the opportunity to share their opinion and their thoughts entirely.

 
  • Close-ended questions: show most in the survey. They may be more suitable for the survey situation when there may be hundreds of or thousands of participants.
  • Open-ended questions: appear most in interviews. They require much more effort from the person answering them and from the analyst. This is desirable in long interview situations with a few people. Also, they can provide answers in situations where researchers have no clue about how to write the question in a close-ended way. But they need to be used carefully and sparingly.
  • The most common type of closed-ended question is the single-answer multiple-choice question. It has a range of choices for the respondent, only one of which may be picked.
  • Another common type of question is the checklist. This question consists of a list of answers, any number of which can be chosen.


  1. Some tips for designing questions:

1). Don’t make people predict their behavior.  People’s past behavior is usually better at predicting their future behavior than their statements are.

2). Don’t overload questions. Each question should contain at most one concept that we are investigating. Compound questions are frustrating for the respondent who only agrees with half of the question, and more complicated for the analyst who needs to infer the respondent’s perspective on both parts of the question.

3). Be specific. Avoid words with multiple or fuzzy meanings (“sometimes”, “around”, “roughly”, “any”). When speaking in units other than money, percentages, or other common abbreviations, make sure that the whole name of the unit is written out (“thousands” instead of “K”,etc.).

4). Never shut people out. Questions should always give people an option that they feel applies to them.

5). Stay consistent. Ask questions the same way every time. This means more than just using similar wording for similar questions. You should also strive to maintain consistency in meaning in the order of answer options and in the way the questions are presented.

6). Avoid extremes. Extreme situations rarely happen, and most people infrequently find themselves exhibiting extreme behavior, so avoid situations that require or imply the need for extreme behavior. (Avoid “every time”, etc.)

7). Make questions relevant. If people are confronted with a list of questions that don’t relate to their experience or their life, they’re not likely to finish the survey.

8). Use Likert scales. Likert scales are a familiar method of presenting multiple-choice answers. They consist of a statement or series of statements followed by a choice of 3, 5, or 7 options (most surveys use 3 or 5) that define a possible range of answers, including a neutral middle option. (“Rate the following aspects of the food websites for how interesting they are to you” .)


  1. Edit and Order the Questions
  • One way to maximize the number of responses to a survey is to keep it short. Most people should be able to complete the survey in 20 minutes or less.

Surveys that take more than 20 minutes begin feeling like a burden and respondents have to schedule time to do them. Since on average reading the instructions takes about 5 minutes and each question takes 30 seconds or so to read and answer. This limits us to about 30 questions total. Keeping a survey to 20 questions leaves us with a safe margin.


  • The question order is as important as the wording. Question order should pace, focus, and selectively reveal information.

A survey is like a short story. The beginning grabs the readers’ attention, drawing them in. As they read the survey, they begin to get an idea of what kind of information the survey is trying to find out.

In the middle, big ideas are explored, and “twists” on the basic plot are introduced as certain avenues of inquiry are followed.

Finally, loose ends are tied up, and the survey ends.


4 parts of a typical survey
1)      An introduction l  The purpose of the survey,

l  Instructions for filling it out,

l  The estimated duration of it,

l  Contact information in case questions arise.

2)      A beginning l  With teaser or interesting questions to draw the attendees of the survey in,

l  Should not be demographic questions (which may bore people and ca n be seen as intrusive at the early stage)

3)      A middle l  Alternating questions

l  Questions should be grouped thematically (using small titles to categorize the questions)

4)      The end l  With all the remaining demographic questions

l  Providing an open-ended field for general response

l  Reiterating the contact information.


  1. Write the Instructions

1). General instructions

1)      The survey is important. “We want to make… a better service for you. Your participation is very important to us.”
2)      What it is for. “The survey is to help us understand the needs and desires of the people using…”
3)      Why people’s answers are safe. “All of your answers are confidential and will be used strictly for research. There will be no sales or marketing follow-up because of your participation in this survey.”
4)      What the reward is. “By completing this survey, you will have our gratitude and a 1 in 100 chance of winning a…”
5)      Who is responsible for the survey. This survey is being administered for*** by …
6)      How long the survey is running. This survey will run from March, 26,2024, until April, 1, 2024.
7)      Who to contact with questions. If you have any questions or comments about this survey, you may enter them into the form at the bottom of the survey or mail them to*** at ***@***.


2). Individual question instructions

Question instructions should be simple and straightforward. Most close-ended questions won’t need special instructions, but open-ended questions should say exactly what kind of answers we want. For questions where we want a single answer, but people may feel that any of several options may be adequate, make it clear that they have to select what they feel is the strongest option.


  • B.  Personal experience about an interview.

Currently, I have no experience in designing a questionnaire and conducting a survey, so I just want to share my thoughts about some do’s and don’t in doing an interview.


  1. Choose the participants from different age groups, occupations, and genders.

If our surveys are not targeted at a specific age group, job, or gender, we should invite as many people from different groups as possible to achieve more convincing results.

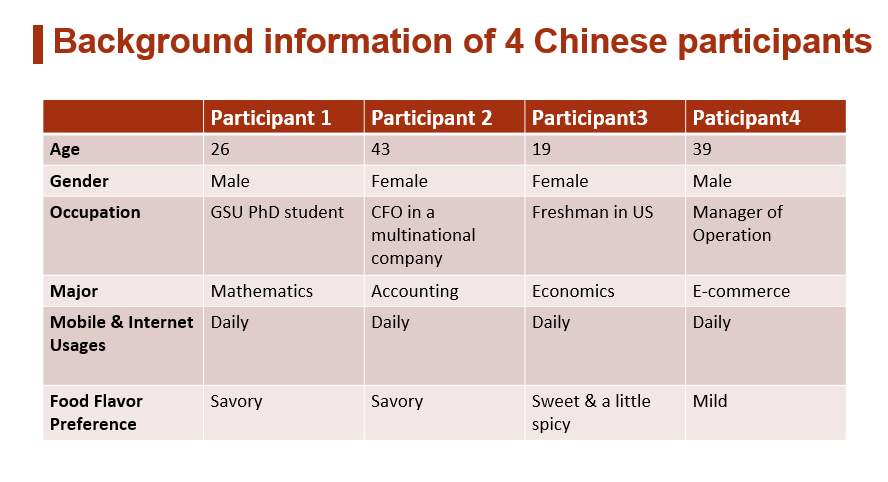
Gender may make a difference! Last week, when I interviewed 4 Chinese about their experience with the food website. I found that 2 females had much better ratings than 2 males with rich experience designing the website themselves. Two men’s working experience may influence their judgment on the layout and structure of the website. However, 2 females may focus more on the aesthetic aspect of the color, images, and fonts. Just as Dr. Pullman said, I need to invite more women and men participants to test if different genders have specific preferences in website design.


  1. Tell the participants that we have nothing to do with the product or service in advance.

As most of the participants we want to interview or invite to participate in a survey are our friends, acquaintances, classmates, colleagues, or even relatives, it is better to tell them beforehand we have nothing to do with the product or service itself. Otherwise, they may want to please us or say something nicer than it is because they want to be “good people” who do not hurt us instead of “good respondents” who tell the truth.


  1. Better not to choose close relatives as the participants.

Last week, I invited my husband as the interviewee. Although he told me some of his true opinions and perceptions about his user experience with the food website, it was hard not to be judgmental towards his answers when they were not what I expected. We argued for some different ideas during the interview. If we invite some acquaintances with some social distance, it is easier for us to be more rational and respectful of their unexpected answers.


  1. Designing questions is an ongoing process.

I told each interviewee the interview took them around 20 minutes. But after I interviewed the first 2 people, I found the interview with 16 questions took up almost 40 minutes. It is very significant for me to make the questions fewer and briefer. Just as Dr. Pullman said, “Your goal is to ask the least number of questions possible to learn what you need to learn”. I need to revise my questions and delete some questions with repeated ideas. Also, I need to order my questions with some grouped themes, such as “UI, UX, and Functionality” to make them more logical to answer.


Some useful links for designing the questionnaires (open-ended/ close questions):

  1. https://www.invespcro.com/blog/open-ended-questions-and-closed-ended-questions-what-they-are-and-how-they-affect-user-research/
  2. https://blog.hubspot.com/sales/the-art-of-asking-open-ended-questions
  3. https://copyhackers.com/2022/03/what-is-an-open-ended-question/


Homework4-UX Performance Analysis: Use Screen Recording to Capture Use of Chinese Food Mobile Web

Homework: Enlist a friend (or 2) to spend 10 (?) minutes using an app while you record them using it. Don’t tell them anything about the software, just the process, that you will turn on a screen recorder, record what they do and say for ten minutes and then ask them some post-experience questions. Reassure them this has nothing to do with them personally; it is not a test of their abilities or intelligence or anything else. This is just about the software and there are many testers contributing data so no pressure of any kind. Remind them to speak freely as they use the software.

After the recording, do a post-engagement review: play the video back and ask the participant to comment whenever they feel like it. Stop the video where they want to speak and record what they said and where they said it.

Post-engagement interview — how did they feel about the whole experience. Have they any advice for you? You will not use any of this advice in subsequent iterations of this test unless what they found is a fatal flaw. You want each iteration to be done in an identical fashion. But you also want to learn over time so the next time you do something like this, use what they taught you.

Goal: to test if a mobile website is accessible and user-friendly that lets Chinese users and a few American Chinese food lovers order meals from the food website on their mobile phones quickly and easily at their convenience.

YiFan is a Chinese food restaurant nestled in the heart of Johns Creek in Atlanta, which offers fusion cuisine.

It offers a pick-up food ordering service through the website https://qmenu.us/#/yifan/menu/1645135062215.


Usability test

  1. I recruited 4 participants who have some experience with ordering Chinese food via online platforms including 2 friends, my husband,1 schoolmate in GSU, and 1 student at an American University.

To truly understand the needs, behaviors, and motivations of the users I’m designing for, my research identified 2 pain points:

1). Ease of Use

2). Time

  1. I used Zoom & Tencent Meetings to record them how to use the website to order their favorite 5 dishes for the Lunar Chinese New Year’s Eve in 10 minutes!
  2. I conducted an online interview afterwards to ask them 16 questions about the positives and negatives of using this food mobile website.

Before the usability test

I told them these instructions clearly and asked them to think aloud while doing the tasks. The think-aloud technique was used to extract information about the users’ thought processes during the task.

Please take 10 minutes to order your favorite 5 Chinese dishes for Lunar New Year’s Eve on this food ordering website. You need to log in to the website using the Chrome search engine on your laptop. But you need to click toggle device toolbar mode (Ctrl+Shift+M) so it can show the mobile menu mode on your laptop, as it is convenient for me to see how you click and scroll down the menu with the recorder. This is for my user experience research need instead of for commercial use.”

  1. You don’t have to go through the full process of buying them. Just order 5 dishes and put them in the shopping cart then cancel.
  2. When you browse the website, feel free to speak out loud about your positive or negative feelings towards any button, image, tag, or any other design element on the website, which will be helpful for my research.”

During the usability test:

Task 1:

Go to the site

https://qmenu.us/#/yifan/menu/1645135062215.

Task 2:

View the Menu

Scroll down to the bottom of the main page to find the necessary information on the menu.

Task 3:

Find their favorite dishes

Find the “menu category”, and choose 5 favorite dishes for Lunar New Year’s Eve.

Task 4:

Put dishes in the cart

Put 5 dishes in the cart and click on “Check-out”.


Task Time and Completion outcome:

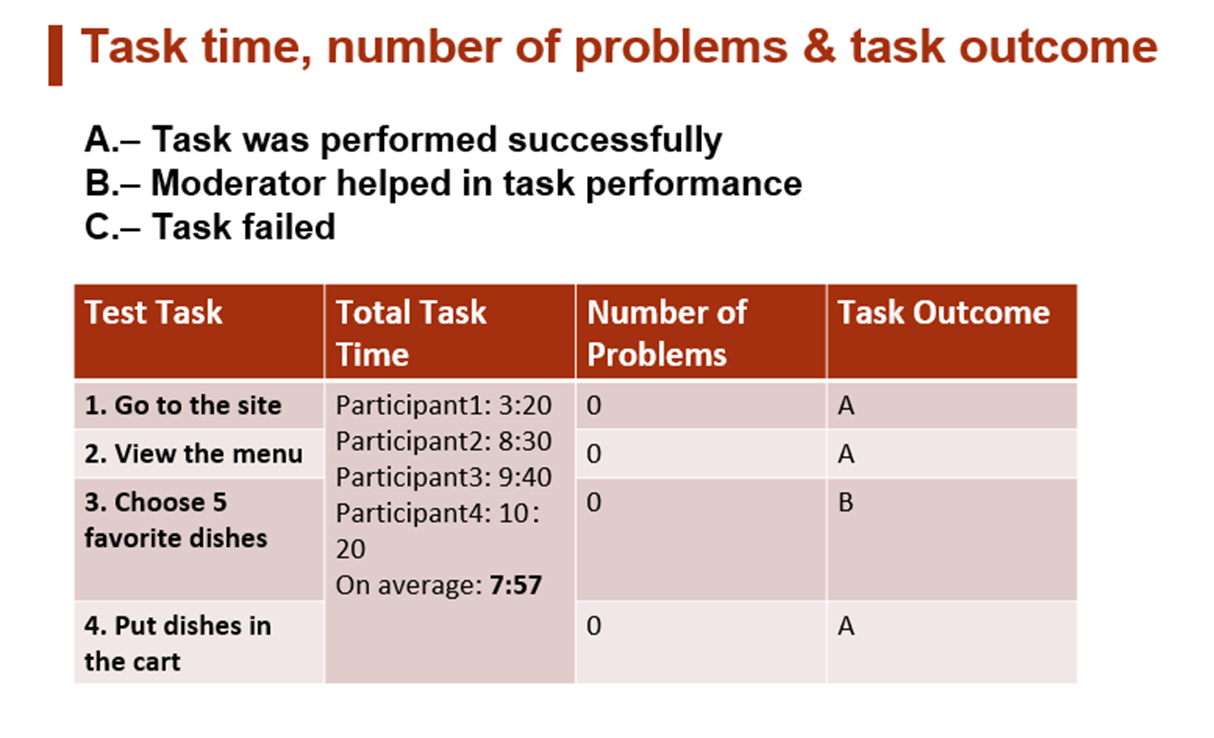
The average task time of 4 participants, the number of problems per task on average, and the task completion of the 4 participants are described in the following table.

Participant 1 Task completion

Participant 2 Task completion

Participant 3 Task completion

Participant 4 Task completion


After finishing the task of ordering the dishes:

I evaluated the usability of the website by interviewing each of them with these questions and made a summary of their opinions.

Interview Questionnaire:

  1. How easy is the website to navigate and search?
  2. Does each food title make sense?
  3. Do you think the Chinese and English fonts are big enough to see?
  4. Do you think the main color of the food website is visually appealing?
  5. Does the food description help?
  6. Is each photo large enough to see?
  7. Can you find your favorite dish quickly?
  8. Do you think it is easy for you to put the dishes in the cart and be ready to check out?
  9. Could you rate it on a scale from 1 to 10? How much do you like the food delivery website?
  10. How much do you dislike the food delivery website?
  11. What do you care about most in the food ordering process?
  12. Do you think it is well-organized?
  13. Do you think it is user-friendly?
  14. What challenges do you face in the ordering process? How does this make you feel?
  15. Is there any way in which you feel these challenges could be resolved?
  16. How do you think the website can be improved in web design and interaction?


Based on the test answers the strengths of the website were:

  1. The website is somewhat easy to use and follow. The rating from 4 users on average is 6.8 which means it can meet basic users’ need for ordering dishes. (2 females give ratings of 8 and 8.8 respectively, while 2 males having experience with website setup give ratings of 5 and 5.5 respectively.)
  2. The color of the food website is generally visually appealing despite that the white background with red logos lacks innovation.
  3. It is very convenient for all the participants to put the dishes in the cart and click on the checkout button.
  4. Most of them can find their 5 favorite dishes on the website in 10 min, although 1 person uses more than 10 minutes and complains the menu lacks any vegetable dishes and ones for vegetarians and vegans.


The main problems of the website were:

  1. The website is not so easy to navigate and users cannot find dishes very quickly without the help of a moderator. On average, they need to spend 7 minutes and 57 seconds to find 5 dishes, because the users cannot find the grey “category” button on the bottom of the main page very easily.
  2. Some food titles are too complicated for most users (3/4) to comprehend because there are some very difficult and are Chinese words to recognize and pronounce like “燎” in the title of Stir-Fry Abalone with Asparagus.
  3. Some Chinese and English fonts are big enough to see but for some Chinese food descriptions are too small to read and the price tags are not obvious to see at all.
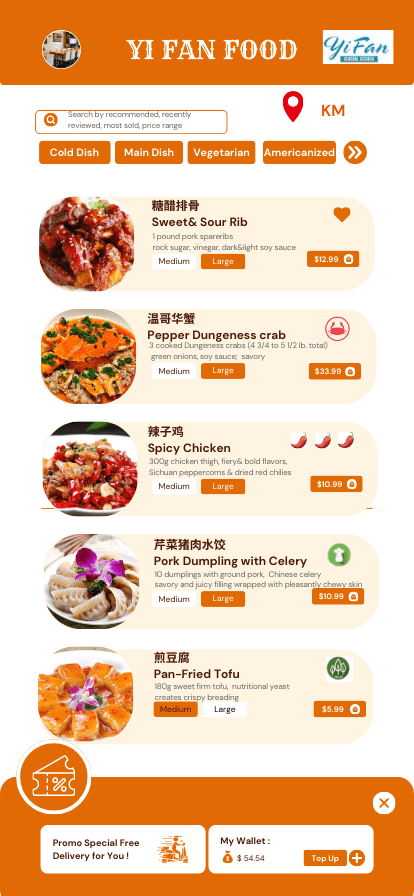
  4. Food pictures and Chinese/English fonts are not very placed in an orderly arrangement.
  5. Although the food description in the smaller fond helps to some extent, some information like the weight and size of the crabs is missing in Yolk Salt& Pepper Dungeness Crab. And not all the dish has detailed food descriptions.

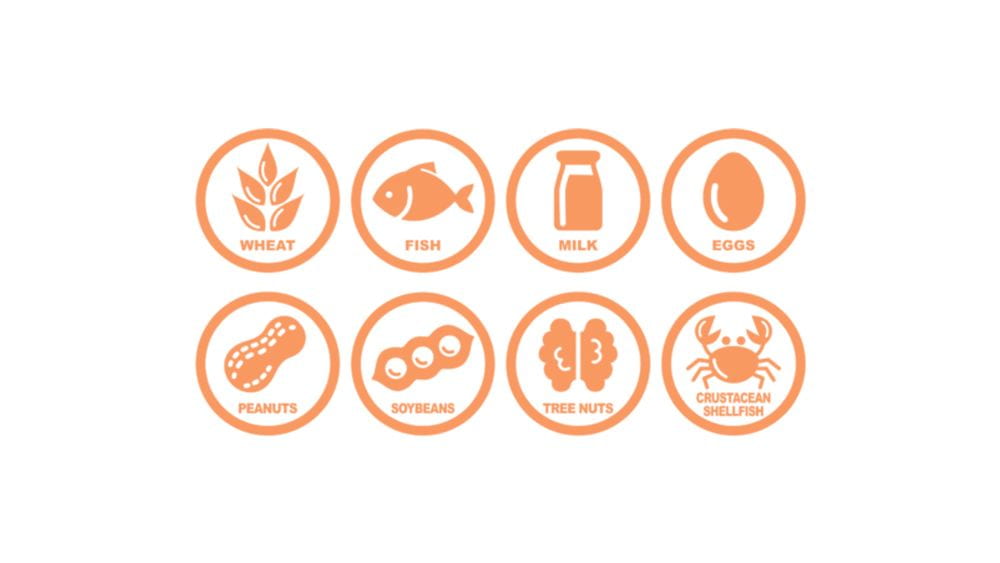
For instance, in Stir-Fry Abalone with Asparagus, there are no labels about the weight of the main ingredients of abalone and clients cannot know whether it is spicy or contains any allergic food ingredients.

  1. Some food photos are not large enough to see as they are not panoramic views of the food and most of them are not authentic food they made (just downloaded from other food websites.) 
  2. Half of the participants say they cannot find their favorite dish so quickly due to a lack of searching tools and no clear category button on the website. So it is not so well-organized and user-friendly.
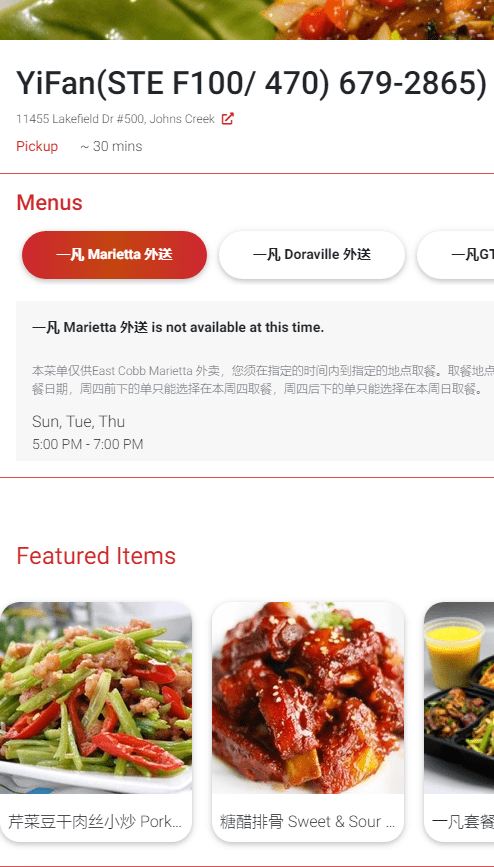
  1. In Featured Items, there are two repeated pictures of the rice.


Expected improvement for the food Mobile Web according to users’ feedback

  1. Add breaking up of appetizers(cold Chinese dishes), entrees (main dishes), side dishes, desserts, soup, salad, vegetarian food, vegan food, gluten-free, and halal food on a category on the top of the home page.
  2. Add distance between the pick-up spot and the client.
  3. Add on-site search and search filtering options like recommended dishes,  recently viewed dishes, and most sold dishes!
  4. Change some Chinese food titles to easy ones without any complicated Chinese characters.
  5. Put Chinese and English fonts in two different rows to make them clearer and put the food pictures just on the left side below each tile.  
  6. In terms of texts, only make the food name and the price bolder and obvious to see. The price should be in red rather than the package information as some users care about the prices of the dishes the most!
  7. Only make detailed food ingredient descriptions visible on the separate specific items page after they click on the title of the food to make them clearer.

For instance, in Stir-Fry Abalone with Asparagus, add descriptions about the weight of the main ingredients abalone on the specific items page and add flavor tags to let users know whether it is spicy or contains any allergic food source.

tak
  1. Invite some professional photographers to take delicate panoramic food photos made by YiFan restaurant to replace some fake ones from other food websites. Users may first pay attention to the food pictures and then to the titles as a picture is worth a thousand words.  Make sure that the food images are real otherwise the dishes may disappoint the clients after being served.  For instance, the Red Kidney Beans Chestnut& Stewed Duck Pot photo should have shown the full view of the duck. The image should have been more visually appealing taken by photographers who should have placed the dish on the beautiful tablecloth and used bright lighting. Clear and fantastic pictures can enhance clients’ appetite and help them to order the dishes more quickly.

Besides, the first picture on the top of the menu should be a real photo of the fantastic restaurant environment of YiFan instead of a chicken picture from another restaurant.

  1. In Featured Items, delete repeated pictures of the rice and add more popular vegetable dishes.
  2. Add typical Chinese food like dumplings on the menu, because Chinese people have the custom of eating dumplings on Lunar New Year because the dumplings themselves look like money pouches and are said to represent fortune and prosperity in the coming year.
  3. Add coupon or discount information for the new user on the top of the menu to attract the first users.
  4. Add ratings next to the food title using the number from 1 to 5 or label how much percentage of people like it. Add tags like Top Offer next to the dishes that are extremely popular as the users who see these tags may follow the trend to order the dishes.
  5. Add tags about flavor below the food titles (typical flavor: savory, spicy, sour, sweet).
  6. Add a food review at the bottom of the page.


Summary:

YiFan’s overall online Mobile Website UX performance is mediocre. It can meet basic needs for users to find the main meat dishes for pick up! However, they cannot choose what are their favorite dishes in a short time and cannot meet their diverse needs such as food choices for appetizers, vegetables, and dumplings for the festival. Their UX is especially thwarted by usability issues related to unclear and not panoramic food pictures, poor navigation categories, and no searching tools.


Homework — Assignment 3-Assessing Zoom’s Features and Usability for Screen and Voice Recording

Homework — Assignment 3-Assessing Zoom’s Features and Usability for Screen Recording

Review one software and show us how you came to your evaluation. You can write your review as text, text and screen captures, a talking head video, or use the software itself to make a video. Blog your review of the software you test drove. Positives, negatives, thumb up or thumb down or wiggly-finger indecisive.


  • What is the importance of screen recorders to UX designers

Screen recorders allow UX designers to observe how users interact with an interface or prototype. This helps identify usability, pain points and opportunities for software and product improvement. The designer can see where users get stuck, what confuses them, and how they navigate the interface.


As a beginner with technology who feels intimidated by using complex applications, I choose to review Zoom as it was the first online class, video conferencing platform and video recorder I used in China in the spring of 2022 during Covid19 pandemic to connect to Canadian colleagues in Ontario.  For UX/ UI researchers, Zoom is a popular and user-friendly tool for interviews, video conferences and video recorder all over the world.


  • What is Zoom

Zoom is a cloud-based video conferencing platform that can be used for video conferencing meetings, audio conferencing, webinars, meeting recordings, and live chat.

Zoom is one of the most popular video conferencing software systems on the market because of its easy-to-use feature set and affordable pricing. According to Zoom’s S-1 filing in early 2019, more than half of Fortune 500 companies are using Zoom, and it earned an average NPS of more than 70 in 2018. Today, more than 500,000 companies’ meetings use Zoom Software on a daily basis.

Zoom One Basic

1.     Free Yes
2.     One button install Yes
3.     One button launch Yes
4.     Basic Recording Needs Yes
5.     Lightweight output Yes
6.     Editable output No
7.     Help Yes
8.     Tutorials Yes
9.     Positive industry reputations Yes
10.  Provide free transcription Yes
11.  Provide free translation   No
12.  Highly customize Kindof


1. Pricing

  • Is Zoom free to download?

Zoom is free for download and use on desktop computers and other internet-ready devices through the “Basic” subscription plan. The free Basic plan for individuals allows up to 100 participants and 40 minutes of meeting time per call. This plan includes many of the same features as the paid plans, such as virtual backgrounds, breakout rooms, and improved security. However, it does not include streaming, reporting, live support, and so on.

Here is the table of detailed Zoom pricing.

As you can see, Zoom pricing starts at $12.49 per user, per month for Zoom One Pro, which includes Zoom Meetings of up to 30 hours in length, Team Chat, and 5GB of cloud storage.

My perspective

I think the time limit for the free version is acceptable to users with basic needs and the host can ask the participants to join the link again after 40 minutes session. But the drawback is that we can just download the recording of meetings to our own computers without cloud storage using the free version.


2. One Button Install

Zoom Meetings are supported on a range of devices, including but not limited to mobile devices, iPad, Chromebook, as well as operating systems such as Windows, macOS, and Linux via the available client download.

The Zoom app installs easily with a simple download and setup process.

My perspective

Zoom app is easy and simple to install and set up and I just spend 2-3 minutes in total to install it.

The first thing I do is to open up the Internet browser Chrome and go to my frequently used search engine Google. Then, on the URL address line, I just type in Zoom. It is very easy to find the first link is the official website of Zoom. Below the title, I just see “Download” very clearly and click on it.


It leads me to the website and the first option is Zoom Desktop Client. It is used for any laptops or desktop computers. (You can also use cell phones to download the Zoom-One Platform to Connect app.)  After clicking on “Download”, it takes me just around 10 seconds to get an exe file on the upper right-hand corner of the Chrome. Then I click on it and initialize it in a few seconds without malware or virus reminders as it is a legit site.

Then I see a very clear home page of Zoom.


3. One Button Launch

I find that whenever I am using Zoom to create a meeting, join a meeting, and record a meeting, it is super fast and easy, which may just take me less than 1 minute.

  • Do I need a Zoom account to join a meeting?

No. While the person who starts a meeting and invites you will need an account, participants aren’t required to sign up for Zoom. Join a Zoom meeting from a Browser (you will need the meeting ID and passcode) In your web browser, go to zoom.us/join. Enter the meeting ID provided by the host/organizer. Click Join.

 
  • How to host a meeting in Zoom?

I try only 5 steps to host a meeting in the navigable Zoom.

1). Sign in to the Zoom desktop client

2). Click the Meetings tab.

3). Near the Upcoming tab, click the  tab to schedule a meeting.

4). Change the Topic and the Time. I click on Recurring meeting to make it recur on a daily/weekly/monthly basis and click “Save”. So I don’t need to schedule a new meeting too frequently.

5). Click Start.


4. Basic Recording Needs                                                                                   

  • Is it simple to start a screen recording in a Zoom meeting?

It is very easy to start a screen recording within an ongoing Zoom meeting.

1). Sign in to the Zoom. In the navigation menu, find the Record tab.

2). Click the record tab to start recording.

3). Click the square button on the top left corner to stop recording.

4).  After clicking End Meeting with Everyone, Convert Meeting Recording just pops up and I wait for around 1 minute. It converts the meeting recording to an MP4 file. It shows on the Recorded tab.


5. Lightweight Output

Software is considered lightweight if it utilizes a limited amount of RAM. For example, an operating system is considered lightweight if its kernel requires a small amount of memory (said to have a “low footprint”).

  • How much space does a 1-hour Zoom recording take?

Recording screen sharing uses about 20MB of storage per hour while recording video uses about 200MB of storage an hour. This is an approximation, since the resolution and types of video or screen sharing content can affect the amount of storage used.


My perspective:

Zoom is a lightweight app because I record a 16 min video conference and it uses only about 40 MB. Recordings are saved as MP4s which are reasonably light. The quality is satisfactory.


6. Editable Output

My perspective:

I cannot edit recordings within Zoom, but the MP4s can be edited in external video editors, so this this the drawback of Zoom.


7. Help

My perspective:

Zoom offers a wonderful support tab on the main page and gives users access to a FAQ and search page easily. Users can also read feature articles with the most typical problems of using Zoom and can use a Chatbot to chat with the artificial support team online.

I think users can get very clear answers quickly by searching their answers to their questions in the search box. But the Chatbot seems not very smart in understanding every question.

https://support.zoom.com/hc/en?_ga=2.195135980.1969842599.1706919625-909900721.1706919625.


8. Tutorials

Zoom provides short video tutorials on common topics, which are very helpful for green hands on https://support.zoom.com.


9. Industrial Reputation (Pros & Cons)

Zoom has a positive reputation as an easy, reliable video conferencing tool.

According to Forbes Advisor, Zoom became a lifesaver for many companies with employees working at home. The brand is an industry leader and one of American’s favorite telecommuting apps.

https://www.forbes.com/advisor/business/software/zoom-review/#:~:text=Security%20Concerns,reluctant%20to%20create%20an%20account.

As quickly as Zoom gained popularity, it also gained a fair bit of backlash over its privacy and security issues. While Zoom remains a top-rated web conferencing platform, its spotty security history might make some reluctant to create an account.


10. Provide free transcription

Zoom provides free transcription services which are very convenient for textual analysis. I just click More and choose Caption Language to English. Then it can transcribe automatically when I speak English.

Live transcription is a feature in Zoom meetings that provides robot transcription services, which enables script-to-text transcription meetings and webinars. It is important to note that this feature is enabled by the host of the meeting or webinar once it begins. However, participants will not see the Live Transcript option unless the host enables it, also the transcript is divided into sections, each with a timestamp that shows how far into the recording that portion of the text was recorded.


11. Translation

For the free version, I think there are no translation services for online meetings and no built-in translation for screen recordings. And I need to use other translation tools Like iTour Translator to get translated captions when I interview foreign UX users like Chinese. The tools allow users to have the speech automatically real-time translated and access captions in another language. For example, if a meeting participant is speaking in English, other participants can view Chinese, Spanish, or German captions.


12. Highly customize

 I think Zoom provides basic customization options for screen recording. However, it is not as highly customizable as some other advanced screen recorders.


With Zoom’s video filters, I can add some fun and creativity to a video call or improve the appearance of the video. These filters can include things like virtual hats, glasses, and makeup, as well as more creative effects like changing the color or shape of my face. To use the video filters in Zoom, users simply need to click on the “Video” icon in the bottom left corner of the Zoom window, then click on the “Video Settings” option.

Studio Effects allows me to add facial effects such as eyebrows, mustaches, and beards, and I can even change my lip color. These effects remain in place even as I move around in the video.

I am extremely fond of the studio effects in Zoom, which can improve my appearance and boost my confidence in interviewing UX users. It is because the features can help me hide facial blemishes or improve the appearance of my face. Besides, Zoom filters are easy to use and can be applied with just a few clicks, making them a popular feature for personal and professional video calls.

But we need to be careful not to use some weird special effects to distract UX users from the usability test, which may have a negative influence on the test result.


Summary

Zoom’s free screen recorder is wonderful and convenient to use for basic quick recordings and it can capture screen, audio, and webcam nicely with speech-to-text transcription. Nonetheless, it lacks advanced features like editing, tagging, translations, and advanced customization.

In addition, the video resolution and recording quality of Zoom aren’t always great. Zoom relies on the strength of an internet connection for quality, and will automatically adjust our quality if our connection cannot support a higher resolution. To get the best possible quality recording from Zoom, we have to enable HD video, create a great recording space, optimize our internet connection, and position our camera correctly.


We can refer to “How to Improve Zoom Recording Quality | Video & Audio Guide”, to know different ways to make our recordings in Zoom better.

https://riverside.fm/blog/improving-zoom-video-quality#:~:text=While%20the%20platform%20is%20convenient,can%20make%20your%20recordings%20better.


UX Week3 assignment Usability Testing

Homework — Assignment Week 3

A. Write up your field notes from today’s experiments — the 5 second test, your using and brainstorming to-do session, the Heuristic Inventory form, and your after engagement reflections.

  1. The 5 second test
  • What is it:

The 5 second test reveals users’ first impressions and gut reactions to designs of an app. It’s a quick and useful tactic for improving UX. The targeted participants are shown each design for just 5 seconds. After the strictly timed 5 seconds, the design is hidden and participants are required to describe what they see or what they think the purpose and pattern of the design is. Designers should analyze results to see if the intended purpose and message are expressed clearly in just 5 seconds of viewing the design.

Also, they need to look for problems of different users who interpret it differently and may need to redesign some elements after the test.

  • Prior

At the beginning of the class, I doubted whether 5 second test could test the users’ understanding of the purpose and main message in the design of an app in such a short period. I believe, especially for non-native English users, they need lengthy time to understand the foreign language and functions of different buttons, images, or labels.

  • During

Luckily, the minimalist design of the prototype app built by ChatGPT has no technical jargon and no distracting elaborate design with only 4 buttons named Add, Delete, Complete, Sort, and a blank box where users can add a new task.

But it was very confusing to me as I had no clue about the purpose of the prototype app without a bolded or colored title.

As a visual learner, I think the combination of blue, white, and dark colors in the interface seems quite dull and unattractive. I think more contrasting colors can make the design more appealing to users who may be used to scrolling through a variety of colored images on the website and have high expectations of the strong visual effect of the interface of the app.


  1. Using and brainstorming to-do session
  • Prior:   
  • Do you use To-do lists? How often?

I use a pen to write ToDo lists on a daily basis because as a procrastinator whose life is very chaotic and overwhelming, I need to jot down what I need to do in learning, teaching, and personal life to help me externalize the main goals per day and prioritize what is significant and less significant. This can help me dampen my sense of anxiety and improve time management skills and efficiency in work, life, and study.

As a person who is not versed in memorizing, to do list with specific tasks allows me not to occupy much space in my mind to recall and avoid long-term cognition overload and can help me more focused on the current moment.

After I cross out some stuff that I complete, it gives me a sense of achievement and self-satisfaction and I am willing to finish more tasks next time.


  • Do you think your prior experience might influence your analysis of this tool?

Yes, my previous experience might influence my analysis of this tool. Because I am used to using to-do lists by handwriting, I am more interested in finding out whether the online to-do list tool is more doable, user-friendlier, and clearer to users than the handwriting version.


  • During &After
  • How well did it work for me?

1). The tile Todo List which is bolded and larger than the other element makes me clear about the purpose of the tool and knows what to do next in the tool.

2). The basic buttons of add and delete are doable. These meet the basic expectations on the to-do list.

3). The minimal design without any image makes the users focus on the function of the tool rather than wasting their time browsing unnecessary pictures.


  • How would make it better? 

1). Make the button “sort” doable and cause no trouble.

This “sort” button cannot work at all when I click on it. I think when users click on or drag one button on the website, they will feel very frustrated and add to their anxiety when they cannot have control of it.  Thus the “sort” button can add some subtasks like “work, study, family” to make it more obvious to the users and let them categorize their different tasks on the list.

2). Add one button called “prioritize”.

The user aims to have a more well-organized life using to-do list. So, they should decide which one is the most important task and needs to be done first and which one is less significant and can be accomplished later. Our brain loves ordered tasks so allowing the users can prioritize the task can make the overwhelming list more structured and help users to have a more productive day.

3). Add one “expected time” button.

Let the users type their expected period to finish each task. Otherwise, the to-do lists without expected time may be just like wish lists and the users lack motivation and do not have the urge to accomplish each task in a fixed set of time.

4). Make the color and design more visually appealing.

Bombarded with colored information on the website, the users may lack interest in such a plain design and need a more eye-catching to-do list with wonderful color match.


  1. The Heuristic Inventory form

The Heuristic analysis is a usability test that measures a pre-production app against industry standards.

  • Prior:

I am very curious about 10 usability heuristics because I think it is very hard to find a systematic way to analyze the usability of a tool.

These heuristics by Jakob Nielsen provide broad guidelines and principles for designing usable interfaces. They are useful criteria to assess and improve the overall usability of a system.


  • During:   
  • Visibility of system status – Keep users informed of what’s happening through feedback and status updates.

(Not sure. The to-do list on Dr. Pullman’s website can show some elements visibly but the users may not know status updates as they have no notification about the updates of this website. )

  • Match between system and real world – Design should reflect the user’s familiar language and logic.

(Yes! The to-do list is easy to understand with plain language in a natural and logical order.)

  • User control and freedom – Provide clear exits and undo options.

(No! I do not think the to-do list has a clear exit and undo button.)

  • Consistency and standards – Follow conventions and maintain consistency across interfaces.

(Yes, I believe the users do not need to wonder whether different words, situations, or actions mean the same thing in this simple to-do list.)

  • Error prevention – Careful design to prevent errors before they happen.

(No, I do not see a good default for slip prevention and undo button for mistake prevention in the to-do list.)

  • Recognition rather than recall – Minimize user memory load by making elements and actions visible.

(Yes, I can see what I have already typed in the blank and I do not need to remember information)

  • Flexibility and efficiency of use – Allow for customization to enhance expert use.

(No, I do not think this tool provides personalization by tailoring content and functionality for individual users.)

  • Aesthetic and minimalist design – Avoid irrelevant or distracting elements.

(Yes, the to-do list just focuses on the essentials and does not contain information rarely needed.)

  • Help users recognize, diagnose, and recover from errors – Provide good error messages.

(No, the to-do list seems not to offer users a shortcut to solve the error immediately.)

  • Help and documentation – Make help easily accessible, and focused on user’s needs.

(No, the to-do list cannot provide documentation to help users understand how to complete the tasks.)


  1. After engagement reflections.

There are several things I have learned from the class engagement.

The most important thing is less is more in the design. From the 5 second test, I find that the first impression of an app is very important to users as they will decide if they want to use it or not from the gut. If UX designers want to design a wonderful interface, it must be simple but effective, focused on the essentials without too many extra elements. Just like Steve Jobs’ presentation slides at a special Apple event at San Francisco’s Moscone West, his slides had extreme visual simplicity with a few words and simple diagrams but they were very effective and intuitive to the audience.

Besides, there are several steps when we conduct usability tests in UX.

1)Define the audience and their goals.

The first thing UX designers should do in a usability text is to figure out who the site is for. In class, we are convenience sample that is a subset of a population chosen simply because we are available in UX class and can share our opinions about the to-do list. But in reality, convenience samples cannot stand for a wider range of users so we should ask:

  • What nouns and adjectives describe the people who the designers expect will use the product or service most often?
  • What differentiates them from everyone else?
  • Is it their age, their interests, their problems? Maybe more.
  • Next, designers should figure out what the key product features are.
  • Why are people going to use it?
  • Why is it valuable to its users?
  • We should use some short keywords to describe our main product advantages 

2) Create Tasks that address those goals.

Write down the most important functions of the site. For example, for the to-do list website, the most important thing for people is to add a new task, mark the task as complete, delete a task sort the task and save the task locally. So the designer should reflect on whether their prototype can do these functions successfully. If “sorting” the task is not achievable, designers should redesign it.

3)Get the right people.

The fastest way to get the users is through the people designers already know, such as their friends, coworkers, classmates, and families. But designers should make sure they are the people who have the needs to use the product and services and they are not familiar with the product and are unbiased with it.

4 Practice suitable usability tests, watch users try to perform the tasks, and have field notes.

5 Reflection after the usability test.

When different kinds of usability tests like 5 second test and heuristic analysis are over, the designers should ask these questions to reflect:

  • Did the users know what the product was for?
  • What worked well? What didn’t?
  • Did users do what designers expected them to do? If not, what did they do?
  • Did users do things in the order in which designers had expected? If not, in what order did they do them?
  • What did users find interesting?
  • How many tasks were they able to do? Which one gave them trouble?
  • When did they look frustrated? Confused? What were they doing?
  • Did the site meet their expectations? If not, where did it fail them?
  • Do designers know what their expectations were?

When designers have outsiders view their products, they can think about whether they should improve their sites, the ways to fix the problem, and who they can work with.


B. Use Figma or Canva or some other mockup tool to mock up a better to-do list tool, where “better” means what you think is better.

I use Canva to design a mockup to-do list. I think it is better because it can meet the user’s other core needs in to-do list such as keeping a record of the date and expected time for each task, ranking the most important task to the least, sorting the task into different categories (work, study, and life) and supporting undo and retrieve. In the table, at first sight, there are 5 tasks they can fill for I do not want the to-do lists too lengthy and overwhelming, which may discourage the users from accomplishing them. So I just want them to think about the most important 5 tasks they need to do in one day. If the users prefer to add more tasks except for the 5 ones, they can also add them at the bottom of the table. Due to the color psychology, I prefer my warmer color choice in the design because I think the creamy and pinkish colors can make users especially anxious users like me feel more delighted and motivated to finish the to-do list than the dull blue one. However, my to-do list also has some downsides, like lacking flexibility and customization.

UX Research&Writing Week1 Assignment

* Assignment A. Read the Cases section of this website, spend some time reading and looking at each example case and thinking about what characteristics they have in common.

From the case studies provided by Dr. Pullman, I find almost all case studies include some key steps in design thinking especially in Haven Self Care Meditation App UX UI Case Study and Redesigning Airbnb for the new normal — a UX case study.

  • Why do we need to care about design thinking?

In the business world filled with complex and varied problems, we need to find a simple and useful way to tackle problems. The design thinking process provides a method and a unifying language for multi-disciplinary collaboration, leading to greater creativity and better solutions for problems faster.

  • What is design thinking?

Design thinking was first written by a Stanford Professor named John E. Arnold in “Creative Engineering” (1959). Design thinking is a human-centered approach to problem-solving that is used to create innovative and effective solutions. It is a process that focuses on understanding the special needs and perspectives of the end users, identifying the underlying problems, and exploring and testing different solutions.

When it comes to UX design, it can help designers create products that are intuitive, engaging, and user-friendly. Design thinking in UX design involves 5 stages:

  • Empathize: Learn about the end user and their specific needs, abilities, and challenges.
  • Define: Pinpoint the specific problem being addressed.
  • Ideate: Generate diverse ideas to address the problem.
  • Prototype: Build a rough model to generate discussion and feedback in order to further refine a design.
  • Test: Solicit feedback from end users.

NB: This process is meant to be a continual, cyclical process of improvement rather than a linear set of steps.

  1. Empathize

The first stage of design thinking is to empathize with the users. This involves understanding their needs, goals, and pain points. This includes consulting experts on the matter, engaging further into the issue to better understand the problem at hand, as well as working on the issue as a group to have a deeper comprehension of everything that is involved with the problem. The stage allows Design Thinkers to gain insight into the needs regarding the issue along with setting aside their personal assumptions regarding it. A substantial amount of information is gathered during this stage and is carried on to the next few stages to help define the problem and understand how to deal with it.

It can be done through user research, surveys, interviews, observation, and competition analysis.

  1. Define

The next step is to define the problem. The designers are putting together all the information they gained during the Empathize step. Essentially, they will analyze their data and put them in order to better concrete the problems. The stage will help the team gather great ideas and be able to understand how to use them effectively.

This involves framing the problem statement, setting goals, and identifying the scope of the project.

  • User Persona:

It is commonplace to set up a user persona in the second step. The purpose of creating user personas is to better understand the users of a product or service. A user persona is a fictional representation of the target audience based on user research that encapsulates their goals, behaviors, motivations, and pain points. It is based on qualitative and quantitative user research, not assumptions, and can represent a segment of their target audience instead of individual users. It usually includes demographic information like age, gender, and location and conveys relevant behaviors, attitudes, and motivations. The designers usually give the persona a name and photo to make them appear realistic.

  1. Ideate

Design thinkers start to use the information from the previous stages to generate logical ideas. The team will start to make ideas that may be “out of the box” or perhaps just ideas that may normally skipped over when not all of the information is presented. This allows for an alternative way to solve normalized problems.


It is significant for the team to generate a lot of ideas during this stage so designers can have many to choose from when starting the next phase Prototype. By the end of this phase, the team should have a few ideas to solve the problem. This can involve brainstorming, HME Questions, sketching, and creating rough prototypes.

  • HME Questions:

Sometimes, designers will use some How Might We questions to explore possibilities or potential solutions to a design problem or challenge and find the best solutions for users. They are open-ended starting structure focused on meeting user needs. Effective HME questions can help designers spark innovative ideas during the ideation phase and maintain a user-centered focus when the professionals evaluate and test design solutions.

  • Wireframes

A wireframe is a basic visual representation of a website, app, or software interface. There are low-fidelity, mid-fidelity, and high-fidelity designs for the wireframe.  Typically, mid-fidelity design for the wireframe involves more detailed representations of the layout, structure, and functionality of the product than low-fidelity design but with less detail and visual polish than high-fidelity designs.

  1. Prototype

With each new prototype, the team investigates different aspects of the problem and explores how each of the prototypes would fix the problem. By the end of this stage, the Design Thinkers should have a better understanding of the constraints that are apparent in the prototype. The prototype is a preliminary version or mockup of a product or application that is used to test and refine its design. A prototype can be created using various methods and tools, such as pen and paper sketches, digital wireframes, or interactive mockups.

  1. Testing

The final stage of design thinking is testing. It refers to the process of evaluating the user interface and user experience of a website, application, or other digital product to identify any usability issues, user pain points, or other areas for improvement.  Even during testing, the team can and will make alterations and refinements in order to make the product more polished for their needs. Essentially, the team can continue to do this until they either solve their problem or until they are satisfied with their product.

  • Usability Testing

The professionals can present findings from usability testing sessions, including user feedback, observations, and any design changes made based on the test results.


*Assignment B. Search for UX case studies and note one you find especially interestingsignificant or emblematic of all cases studies. The criteria of your preference is up to you. We just want more cases to look at.

I find one UX case study that is intriguing is Anisya Firdha Khairani’s UI/UX Portfolio: ZARA Website Case Study.

Below is the link https://medium.com/@ansyfkh/ui-ux-portofolio-zara-website-dd7a783470e6.

The reason why I choose this case study is that the author has a very clear-structured analysis of her redesign. Below is the screenshot of the mindmap I made about her analysis structure in the case study of the ZARA website. In addition, I am fond of Firdha’s complete and systematic analysis of the data, which made her result more convincing. Just as she mentioned, “Before designing the prototypes, I made a solution idea, affinity diagram, prioritization idea, information architecture, user flow, and crazy 8’s.” What’s more, I am keen on her smart choice of consistency with the original design style of the company.  ZARA uses basic colors for its website so her redesign style guide is not too different from the original.


*Assignment C. Based on your thinking and the outlines provided by ChatGPT and Copilot, design your own preliminary case study outline. What parts do you think are the necessary core of a case study? You might like to consult one or more of the other AIs.

My own preliminary case study outline:

  1. Background:

In the beginning, there should be brief background information on the product or service and the goals of the redesign.

  • the client/ the user
  • the industry
  • the problem statement
  • the goals and objectives
  1. User research:

This part explains how the UX designer conducted user research to understand the needs, preferences, behaviors, and pain points of the target users.

It may include methods such as

  • Qualitative research:

The goal of qualitative UX research is to understand users’ needs, perspectives, values, priorities, and context and gain empathetic insights that drive design decisions. It provides the “why” behind quantitative usage data.

User interviews – One-on-one conversations with potential or current users to understand their perspectives and needs. Interviews allow designers to ask open-ended questions and probe for deeper insights.

Focus groups – Facilitated group discussions with 6-10 users. This allows observing interactions between users and how they build on each other’s ideas.

Ethnographic research – Observing people in their natural contexts, such as at home or work. This can reveal insights that users themselves may not consciously realize.

Diary studies – Asking users to record thoughts, emotions, or activities related to the product or service in a diary over time. This captures real-world behavior.

User testing – Observing users interact with prototypes to uncover usability issues and confusion areas. Moderators ask questions as users think aloud.

Surveys – Good for getting broad feedback from many users. Open-ended questions allow for qualitative data even in a quantitative method.

Analytics – User behaviors, clicks, journeys, etc. provide qualitative insights into how products are used.

Social media monitoring – Comments and conversations by users about a product reveal feedback, pain points, and needs.

Card sorting- Cards representing product content/functionality are created. Representative users sort cards into logical groups and name the groups. Researchers analyze results to reveal users’ mental models for categorizing information.

  • Quantitative research

The goal of quantitative UX research is to back up design decisions with hard data-driven evidence. The numbers provide the “what” to complement the qualitative research that provides the “why”. The quantitative data delivers measurable evidence to demonstrate if designs truly meet user needs and business goals.

Usability testing – Measuring task success, completion rates, errors, and time-on-task during user testing sessions. Provides quantitative data on usability.

Surveys – Closed-ended questions answered on a numeric scale provide quantitative data on user preferences, behaviors, attitudes, and satisfaction.

Questionnaires – collecting quantitative data from many users efficiently through closed-ended questions. Effective questionnaire design includes using rating scales (e.g. 1-5, agree-disagree), multiple choice, and selecting all that apply questions.

Analytics – Event tracking and usage logs provide numerical data like page views, clicks, conversions, drop-off rates, etc. that inform UX decisions.

A/B testing – Comparing metrics like click-through rate for two variants of a design provides quantitative analysis of the better-performing option.

Eye tracking – Providing numerical heatmaps of where users look on a page and measures focus on key elements.

User interviews – This can involve numerical rating scales to gather quantitative feedback from users.

Benchmarking – Comparing user experience metrics from industry testing databases provides context and benchmarks.

Personas – Incorporating quantitative data on user demographics, stats, and behaviors makes personas more realistic         

          3. Ideation:

This phase describes how the UX designer generated and evaluated ideas to solve the problem.

It may include methods such as

  • brainstorming
  • sketching
  • wireframing

A wireframe is a basic visual representation of a website, app or software interface.

  • prototyping

The prototype is a preliminary version or mockup of a product or application that is used to test and refine its design. A prototype can be created using various methods and tools, such as pen and paper sketches, digital wireframes, or interactive mockups. With prototypes, designers can experiment with different layouts, features, and interactions to find the best solution for the user’s needs.

  1. Design:

This part presents the final design solution that was chosen after testing and feedback. It may include screenshots or mockups of the interface elements, interactions, animations, etc.

  1. Evaluation:

This section summarizes how the design solution was tested with real users and what results were achieved.

It may include metrics such as

  • usability scores
  • satisfaction ratings
  • conversion rates
  1. Reflection:

This includes what has been learned and what challenges have been faced from the project.

  • key takeaways
  • limitations
  • recommendations for future improvements or similar projects


From my perspective, user research is the most crucial part of a case study of UX design as it can provide some indispensable information for the following steps from the perspective of targeted users.

There are some positive effects on satisfactory user research.

First of all, great user research can help the insiders not to design just for a narrow scope of user groups.  The research will showcase who are real or potential users, which might be over the expectations of designers.  Secondly, the results from the user research coupled with some scientific and systematic methods can help UX professionals to avoid some biased subjective opinions and stereotypes in design. From the research, designers can know what are users’ problems and pain points, on which occasions they will use the products, or what kind of services users need. This information can provide some useful threads for thoughts on UX design in the next steps. Thirdly, good user research can help companies to save manpower, money, and material in real business.

Furthermore, if someone wants to become a wonderful UX designer, it is essential to have empathy for end users through user research. As their job is to make designs to attract users, UX professionals must understand their users thoroughly. They should build empathy for other humans who experience the product they create. In UX design, having empathy enables the designers not only to understand users’ frustration, but also to be familiar with their desires, fears, abilities (physical and emotional), limitations, reasoning, and goals. Conducting effective user research in case study can help designers fully understand their users so they can create innovative solutions for their problems as well as effectively enhance their lives.