First off, isn’t it remarkable how fast time flies? Thanksgiving Break is right around the corner, and the SIF team is working hard to close a couple of projects by the end of the year.
Today I want to take a brief moment to muse about the SIF program, its project management component, and how all of this relates to me personally as a PhD student in the humanities. I take inspiration from Ashley’s latest post which begins an examination of the ways various institutions of higher learning are responding to the “crisis in the humanities” and the need to revamp doctoral programs in the future (and rightly so if I may add). You can find her excellent and insightful post right here.
In her post, one item in particular caught my attention: the need to expand professionalization opportunities for grad students in the humanities and that departments should provide students with opportunities to develop their skill sets in various, but mostly traditionally non-academic areas, including project management. I agree with her assessment that the SIF program provides a great platform for humanities students to acquire project management experience, especially since they are the ones who usually occupy leading roles in the SIF project universe.
Yet, our role at SIF can both be seen as a blessing and a curse: a blessing because, for lack of a better phrase, we can get our hands dirty. Rather than confining ourselves to working on our own research, teaching classes for our respective departments, and assisting department faculty with their research tasks, the SIF program allows us not only to look beyond our own back yard but to engage in, manage, and supervise cross-disciplinary, cross-sector project activities. For someone like me who wouldn’t be opposed to the idea of seeking a career outside the academia, the SIF experience has been very rewarding. Then again, our role is also burdened by the fact that as grad students in the humanities we’re leading interdisciplinary projects without having gone through proper project management training first. Naturally, I cannot speak for other members of my graduate cohort, but as far as I’m concerned, I freely admit that most of the work I’m doing is based on the experiences I’ve gained as an instructor at Georgia State University, and not on knowledge I’ve gained through formal training in project management. My experiences as an instructor, i.e. syllabus design, semester planning, session prep, classroom dynamics, have been my main resource so far in terms of making project management related decisions. I’ve often drawn upon these experiences for guidance. It’s as simple as that, and things have worked out well so far. The thing that gives me solace and confidence, however, is that the projects I am or have been leading consisted of clear, manageable, and straightforward goals. If they hadn’t been, I might have encountered a few road blocks that would have left me truly exasperated. After all, teaching skills and classroom management experiences can only get you so far. Fortunately, problems haven’t happened yet, and I take further solace in the fact that I’m working with a great bunch of students whose work continues to amaze me. In fact, I might want to add this as an additional blessing here, actually.
Knocking on wood, here, but what if it does pose a problem? What if in our roles as project leaders we encounter times when we can’t draw on our experiences as instructors to resolve a project-related issue? As Ashley’s post illustrates, the field of humanities has, indeed, recognized the need to reassess doctoral programs and graduate student success. What this also means is that my doctoral cohort is located on the cusp of a major development in graduate education. While many still pursue a PhD degree to seek a career in academia, others are not so opposed to exploring alternative areas of employment that are outside the academy. For the latter group, the issue then surrounds the acquisition of proper skills that are applicable outside the academy while in grad school. And these are the kinds of skills that many of us, including me, are currently seeking and trying out in a, shall we say, rather messy way.
When I arrived at GSU, the first thing I had to do in order to be eligible for teaching was to attend a pedagogy class. That was mandatory, the pre-requisite. The same thing could and, as I believe, should be sought for graduate students who are eager to develop professionalization related skill sets. But from where? I’ve done some digging and the Robinson School of Business offers a certificate in project management. The certificate is awarded after the successful completion of a 4-day intensive class that helps participants to develop proper and successful project management skills. I think that the SIF program would benefit greatly if students who occupy roles as project leaders receive a more formal training in this area. The only and quite common problem, of course, is cost. Without question, this particular class is quite costly. But I still believe it would be a good idea to get into a conversation with Robinson faculty. My hope is that we can establish a single day workshop for the SIF program at the beginning of a semester that allows us to further develop and refresh our project management skills, not only in view of our personal professional goals in the future, but also in light of the projects we want to work on in the future. The better we are prepared as project managers, the more productive we can be in our roles as SIF fellows and the better we can manage our own responsibilities of finishing our degrees. As a current doctoral student who not only recognizes the need for a more wide-ranging training in the humanities but who also very much subscribes to proposed directions and goals, I’m very eager to participate in an effort to explore possible options for the SIF program to give its fellows a more formal training regarding project management.
I feel this semester I’m pretty much on a “project management” information expedition, trying to come to grips with various aspects pertaining to the field. Things like how to keep track of work; how to define suitable and manageable timelines; how to keep everyone engaged and sustain high levels of motivation for a project over an extended period of time. In the end, it’s all about making appropriate decisions.
Some of these aspects have been quite straightforward to figure out I would say. Over the summer, for example, I slashed my way through a formidable jungle of online project management platforms currently available. I demoed many, and we finally settled on Producteev (I talked about this in a previous post). I must say that having Producteev has been really helpful so far for us to keep track of progress, and set project goals over the course of a semester or a year.
But figuring out how to best engage members of a team, who bring various skills to the table, how to keep everyone motivated, how to avoid bottlenecks…essentially, how to lead and how to make sure that you feel comfortable in that role, that’s something a bit more complex as it turns out. Granted, when you look for information regarding project management, you can find lots of information on how to structure project tasks and tailor the work to the deliverable (for example, you may want to apply a traditional waterfall approach, or you think an agile or iterative approach might make more sense). But that doesn’t really address how you might want to project yourself to the team, and most importantly, how you can make that you feel comfortable in that role. That being said, I’m currently trying to figure out a suitable persona for myself. Do I consider myself more of a control freak? Do I want to give as much freedom to the team as possible? Or would I feel most comfortable as someone whose managing style falls somewhere in between these two extremes?
Just to be clear, I’m not starting from scratch. Having taught writing classes at GSU prior to starting my position as a SIF fellow, I do feel comfortable managing people and I believe that teaching provides a great foundation in that regard. Yet, I recognize that the managing skills I’ve developed as a university instructor can only get me so far when it comes to managing project teams. After all, one crucial, and obvious difference between managing a class of students and leading the members of a project team is that in the classroom environment the goal is to help improve each student’s skill(s) related to the subject, i.e. the goals and requirements for each student to succeed in the class are pretty much the same. But when it comes to leading and managing a project team, the work is usually more collaborative in nature. Project teams consist of members that bring different sets of skills to a given project. A database related project that has a website component, for example, brings together someone who is an expert in database/backend work, and a designer who is responsible for the corresponding frontend, the website. And not to forget, the goal is to successfully submit a deliverable, and not assign grades. Still, I consider teaching experience of great value here especially as it relates to organizational questions such as time management, setting goals, and identifying resources. But spending some time to learn about different managing styles can be equally helpful.
So, for today’s post I thought I’d share with you a video I recently stumbled upon. It’s a TED talk by orchestra director, author, and consultant, Itay Talgam. In this very engaging and entertaining and insightful talk, Mr. Talgam discusses various managing styles by way of using the particular conducting styles of various, famous orchestra conductors as an analogy. Let’s watch!
First off, what I take from this video–and that’s quite comforting–is that the product, the deliverable, i.e. the performance, is wonderful in each case. So, it’s really a matter of personal preference…to choose which style of conducting, i.e. managing, you find most appealing, either for yourself in general, or in light of the particular requirements of a given project.
It’s quite obvious that each conductor shown here embraces a different approach to leading the orchestra. The late Carlos Kleiber seems to excel in a process-based approach. He motivates his team by projecting confidence, by providing the conditions for each musician to have a personal investment in the success of the performance. Highly flexible, very 21st century, in my opinion. Kleiber’s conducting approach works really well for a project that’s based on an agile or iterative management approach, I would say, in which the goals of a project need to remain flexible in order to respond to a client’s needs. By contrast, famous Italian conductor Riccardo Muti, seems to prefer a highly structured approach to conducting, which might work well for a project that uses a waterfall approach. He displays a commanding presence because he considers himself responsible for the success or failure of the performance. He ostensibly controls the performance. He is very clear in his instructions. As Itay Talgam notes: “maybe a little bit over-clear.”
Richard Strauss, then, is very much in favor of playing things by the book. His approach is rather formulaic, he prefers pragmatism over personal expression, and his conducting style is very much about sticking to what’s necessary. This approach certainly gets the job done, but I wonder whether the team could have made the product better if they had been given a bit more room for personal expression and experimentation…Now, Herbert von Karajan’s conducting style seems to be pretty out there, putting a lot of responsibility onto the shoulders of the team members. To paraphrase Talgam, team members are much more responsible for figuring out how the goals of a project can be met, how they can ensure that the deliverable becomes a success and is submitted on time. That style of leadership may certainly enable a team to bond, but I find that approach a bit too chaotic, to be honest…
Finally, Leonard Bernstein. His approach, as Talgam puts it, enables each musician to tell a story and to claim partial ownership of the entire performance. It’s a very feedback-based, reflective style of leading. This, to me, might be a suitable for a large-scale project which consists of various sub-projects that have their own teams.
So far I’m very much in favor of Kleiber’s approach, but I’m curious to know your perspective. Let me know in the comments. Which conducting/managing style do you prefer? Keep in mind that each performance, as you’ve seen in the video, was beautiful, so there is no right and wrong answer really.
To end my post, I’d like to leave you with yet another conducting style, which some of you might prefer
…I doubt it, though. 😉
Enjoy! (quick note: the performance really starts one minute into the video, so be patient 😉 )
Today’s post will mostly be interesting for those of you who have an interest in audio post-production especially when it comes to dealing with the kinds of unwanted issues that ‘pop up’ during the recording process (pun intended, more on this later).
The projects I am currently working on is about creating and curating a number of video interviews to promote hybrid pedagogy (some also call it blended learning) and provide advice for faculty and students who want to try out hybrid forms of teaching and learning.
While the visual material has already been cut, there are still a couple of issues as far as the audio is concerned. As our interview videos will consist of both voice and background, we need to find a proper balance between the two. That means that some level adjustment is in order. Besides that, we will have to deal with some unwanted noise that found its way into the recording, the humming of the air conditioning for example. So, what I am going to do now is run you through the way I am dealing with these kinds of problems.
Before we begin, here is a quick and dirty run-down of the steps involved in processing audio for the video: cleaning and consolidating tracks, level adjustments, filtering out unwanted background noises, compressing, and limiting. All of those steps I applied to the vocal performances.
On a side note, the software I am using for this project is Pro Tools. However, since all of these tasks are basic elements of mixing, they can also be accomplished with other available software that’s currently on the market such as Logic Pro, Cubase, Ableton Live, or GarageBand.
Before we begin, if you interested in learning more about audio recording, mixing, and post-production then check out the tutorial videos on Lynda.com. Georgia State University has access to the entire Lynda catalog of videos. You can use your campusID and password to sign in. Once you have access, I suggest you check out the following videos: “Audio Mixing Bootcamp,” “Foundations of Audio: EQ and Filters,” and “Foundations of Audio: Compression and Dynamic Processing.”
1. Cleaning up and Volume Adjustments
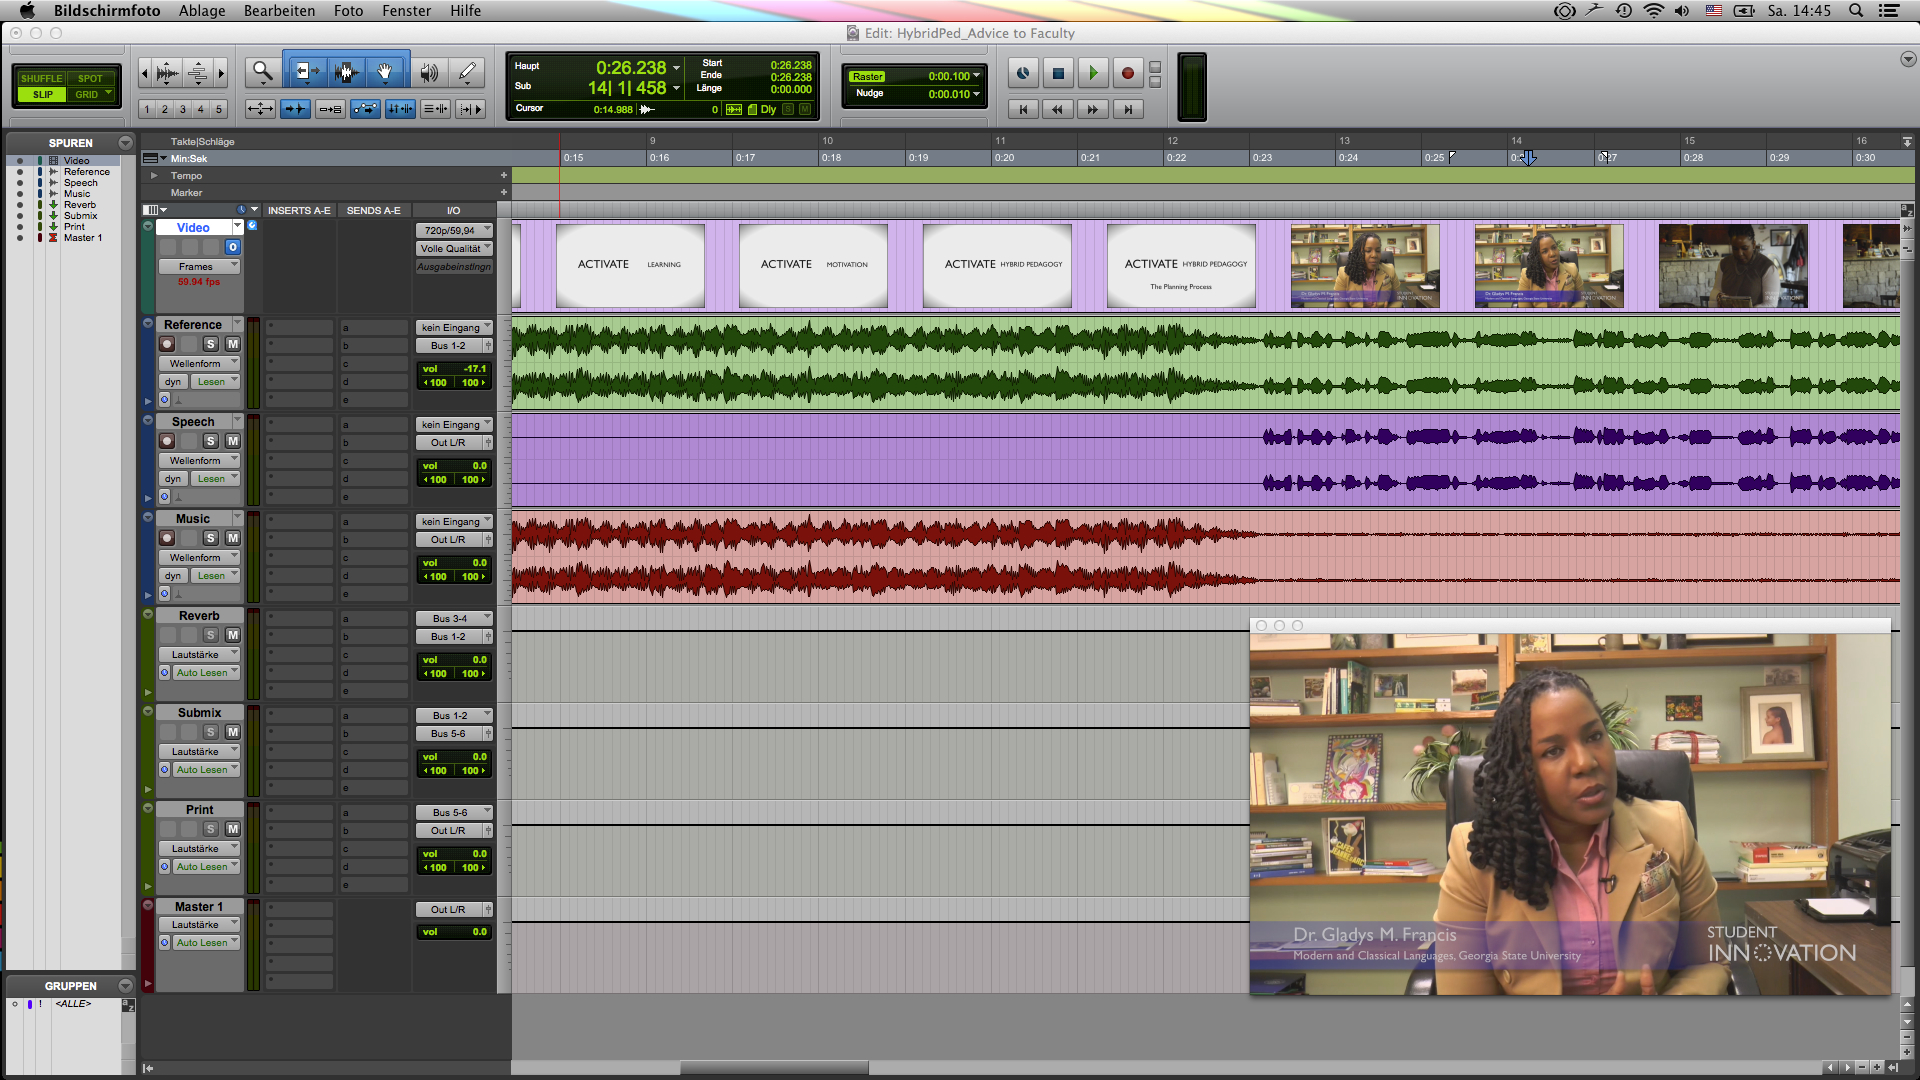
Below you see my point of departure. I started out with a total of four tracks. From top to bottom: the video track, a reference track that contains speech as well as music, then a track that contains all the interview bits, and finally the background music track.
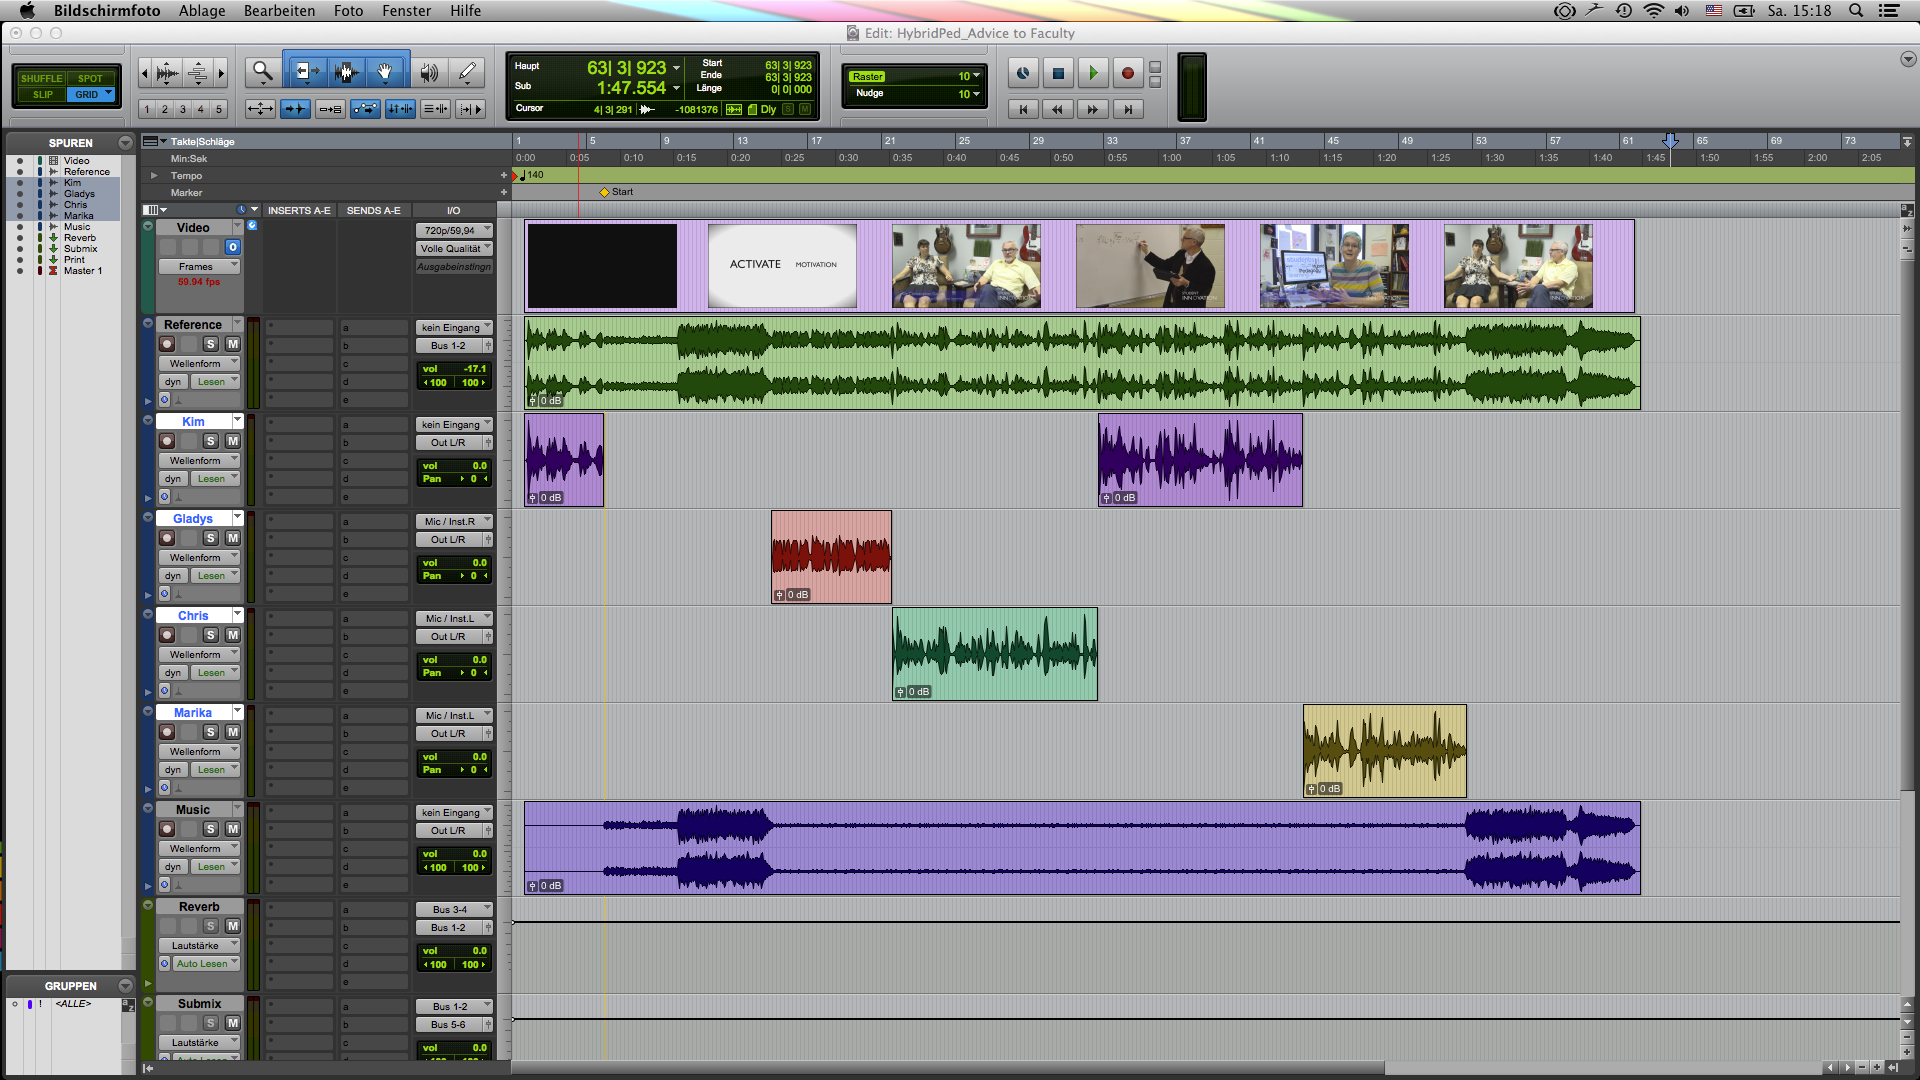
What I already know is that since we’re dealing with four speakers (three women and one man), we’re going to run into issues if we process the voice track as a whole. Each speaker will have a different timbre, so if the processing works for one speaker, it will surely not work for the other three. Therefore, I cut the voice track and created new audio tracks, so that I can process each speaker individually. For the background music we’re relying on a pre-recorded music track with a Creative Commons license, which means it is freely available, and also already processed. So, no need to add further processing to it. However, what you surely want to do when you have music as part of a video interview is to have the automatically decrease in volume when there is speech, and then increase again during pauses or sections where there is no speech. What we want to accomplish is a consolidated listening experience from start to finish. This automatic volume adjustment is called “ducking”. If you look at the image below, you will see the music track in purple at the bottom. Notice, how the waveform is larger when nobody speaks (i.e. relative to the four tracks above you’re seeing above the purple track), and much smaller overall when there is speech.
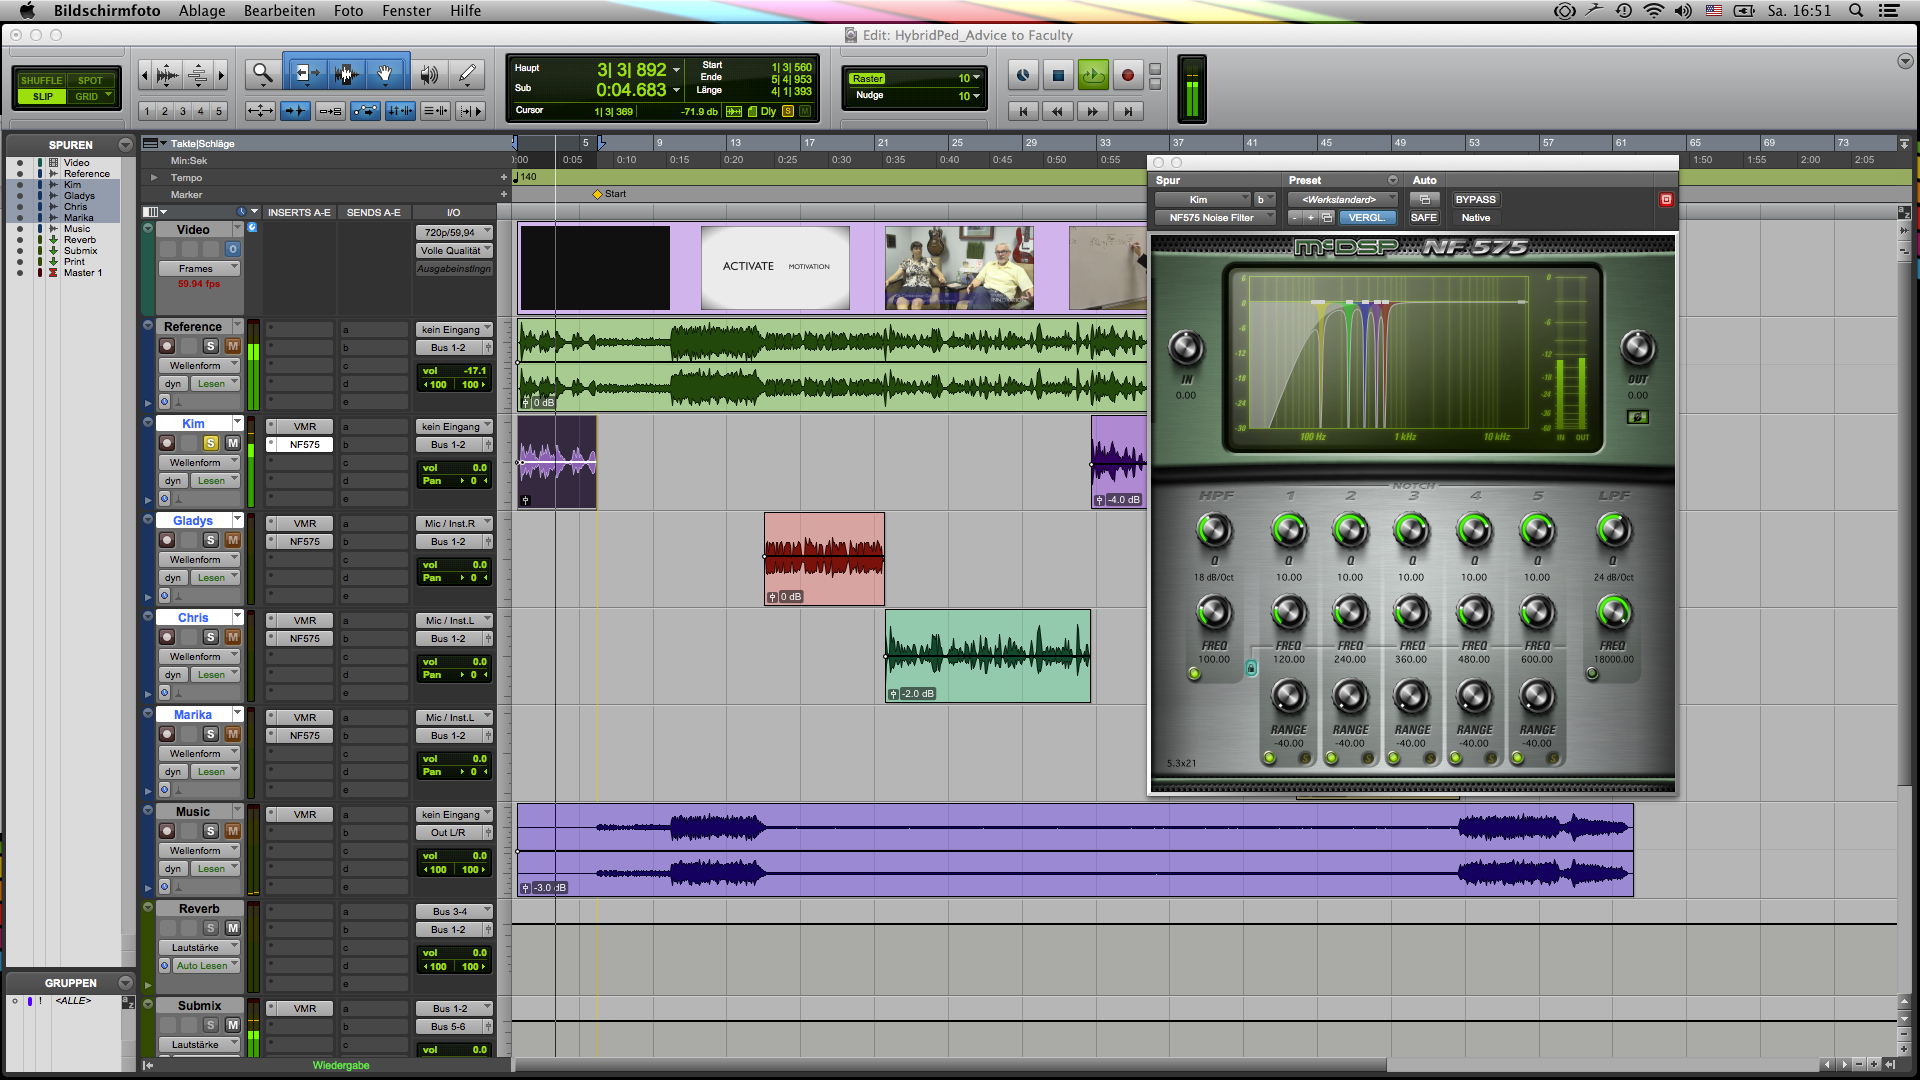
Now that this is done, we can start dealing with the biggest issue: noise. I’m sure most of you have experienced the kind of background noise I’m talking about. Take for example a video recorded on a smart phone and instantly uploaded to YouTube. In the background you might hear a hum, or hiss, that’s quite noticeable throughout the entire video, so much so that it can distract you from focusing on the content. One of the most common background noises is the so-called 60 Hz cycles hum, caused by electro-magnetic vibrations. Let’s hear an example of it in isolation.
There are two ways to deal with these kind of unwanted noise problems. The first is to use an equalizer, which is nothing more than a frequency-based volume control at the end of the day. Today’s digital equalizers commonly include a visual graph of the entire range of frequencies we can process. That makes it easy to locate the 60 Hz frequency by turning the frequency control knob, and then notching it out with the gain knob. Keep in mind, however, that you want to use a very narrow bandwidth so that the equalizer only applies processing to the frequency in question. The so-called Q-knob allows you to narrow the bandwidth. The other way is to use more specialized tools for that purpose. The benefit of using a specialized tool such as the NF 575 noise shaper which you’re seeing in the screenshot below, is that these types of plugins automatically take into account the fact that background noises such as buzz and hum not only occur at the core frequency, but they also translate up the frequency range in regular intervals, which are called harmonics. If you use a standard equalizer, you would have to find the upper harmonics, that contribute to the noise, manually. Specialized tools will do that work for you. Notice the visual graph in the plugin window below, and you will notice that it is not just the core frequency that is notched (in yellow), but also the corresponding harmonics (in green, blue, and purple). In addition, when processing voice material you want to make sure to filter out all the audio information that lives below the frequency range of the human voice, which is usually between 75 hz to 12,000 KHz. Microphones have a much wider frequency range than what the human voice uses, which means that a microphone will pick up more information than is needed. For Kim’s vocal track, that meant cutting away all the audio information below 100 Hz (colored in gray) since her voice doesn’t use that frequency range at all. Be careful, though, when you use filters. You don’t want to set the filter too high. 75-100 Hz is usually good for male voices, 100-125 Hz for female voices.
As you can see (you might have to zoom in a bit), the first frequency (no# 1) is set to 120Hz. With a simple press of a button, the other four frequency bands automatically settle on the remaining harmonic frequencies above the core frequency. Let’s hear the difference:
With noise:
Without noise:
You can do the same thing with a regular equalizer. You just need to make sure that you find those upper harmonics.
To conclude the first step, I did some minor level adjustments so that all the speakers are roughly equal volume.
2. Using the Equalizer
Once I was happy with the results, I moved on to applying some equalization of the signals. I knew that I would be using some compression (basically automatic gain adjustment) later on to smooth out the overall volume of the tracks, and to avoid audio spikes from happening. Therefore, I applied some equalization before the compression because I didn’t want the compressor to react to frequency content that I didn’t consider relevant.
I understand that this whole window must seem confusing, but what I want you to look at is in the lower right corner. There you see a visual representation of the equalizer. In almost every recording, there are parts of the audio signal that become problematic when multiple signals are played back together. Then, certain frequencies start to compete with one another. Perfect example is a vocal and a guitar. Both instruments use a similar frequency range. Within that frequency range, however, there are parts which really help the guitar to be heard while others really help the vocal when played together. Therefore, it’s a common practice to cut out some frequencies from the guitar to make room for the vocal, and vice versa.
But moving back to the work at hand. I carved out some unnecessary frequencies to make the vocal sit better with the music in the background.
3. Compression
There are entire books that discuss compression, so I won’t be really going into details. However, I’d like to give you at least a general idea about compression and what it does: let’s say you’re driving in a car with your mother. Your favorite song is playing on the radio, but there are parts in the song that your mother finds way too loud. So, anytime she thinks the music crosses a volume level she isn’t comfortable with she automatically reaches for the volume knob, turns it down and brings it back up in accordance with her overall volume preference. An audio compressor works quite similarly. It’s automatic volume control. A compressor usually consists of four parameters: attack, release, threshold, and ratio. Going back to the car analogy: attack is the amount of time it takes your mother to reach for the volume knob on the radio, release is the amount of time it takes her to bring the volume back up once each loud part of the song is over, threshold is the volume level above which your mother freaks out because it’s too loud, and ratio translates into the amount of volume that she attenuates. In essence, a compressor is a tool that you can use to deal with sudden peaks in the audio signal, thereby smoothing the perceived performance.
Coming back to the video, take a look at the following image, and notice the wave form in the yellow-colored block:
As you can see, there are a couple of spikes in the signal. Using a compressor can help taming those audio signal peaks in order to create a more even performance. Below is an image of a compressor, the CLA-2A, which I used to level out the vocal performances.
4. Taking care of Sibilance
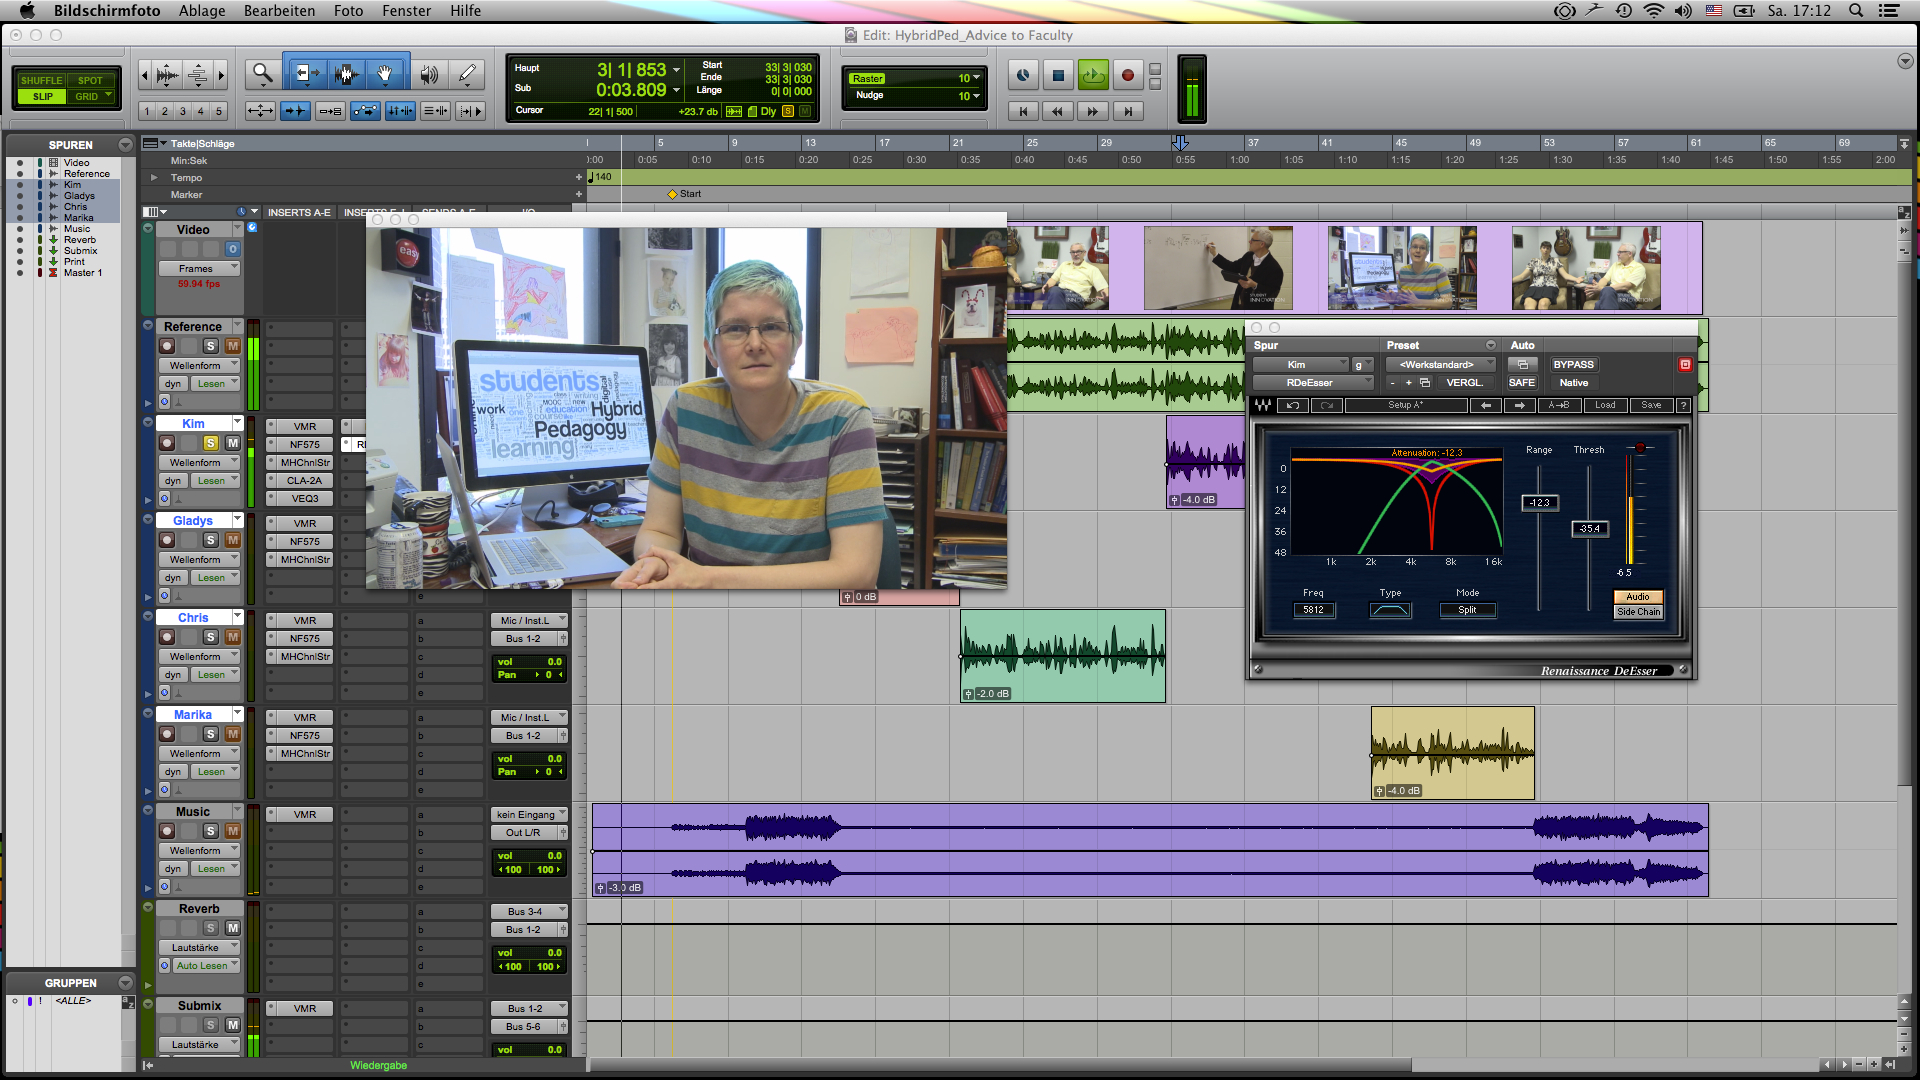
Oftentimes, especially with vocal performances, we also encounter unwanted high frequencies that occur when words are spoken that contain S’s, F’s, P’s, and T’s. The most common issue is with sibilant S’s. To deal with those unwanted kinds of sibilant hissing noises, I use a specialized compressor, called a “de-esser.” This particular compressor can be set only to those sibilant frequencies without affecting the rest of the audio signal. In the screenshot below, you see the de-esser on the right sight, providing a visual graph that shows the frequency which is being attenuated:
If you look closely, you’ll notice that the top left of the plugin contains a visual representation of the frequency spectrum. Below there are three controls. I’m using the “Freq” button to set the desired frequency where the sibilant noises occur, in this case 5812 Hz. Then I lower the threshold on the right until the S’s are being attenuated. Watch out, though. If you set the threshold too low, then too much of the sibilance is lost, and the speaker will appear to have a lisp.
Let’s hear what the de-esser does to the signal. Listen closely to ‘ch’ in the word “teaching” and the ‘s’ in “course”:
Without De-essing:
With De-essing:
The key is not to get rid of the sibilance entirely. Then it wouldn’t sound natural anymore. But you do want to tame those moments of sibilance a bit.
5. Limiting
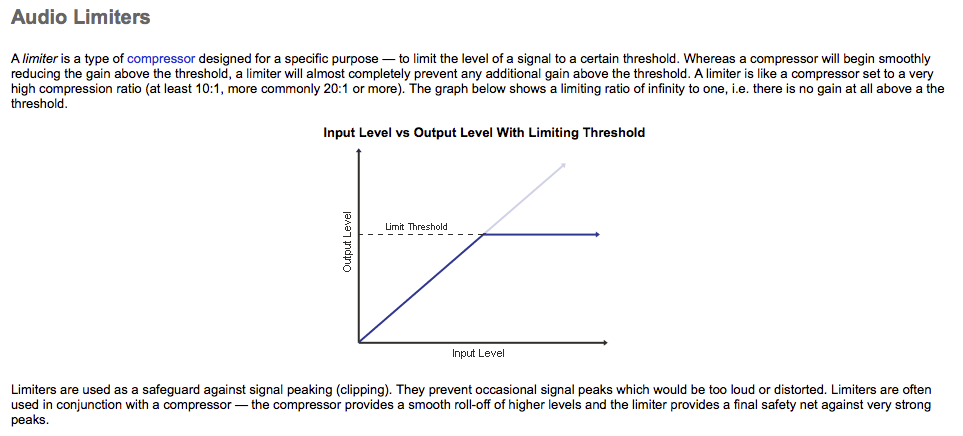
As a last step, I used some limiting to bring the entire audio signal to a more reasonable listening level overall. Limiters are special kinds of compressors that usually come into play at the end of a chain of processing to prevent audio signals from clipping and distorting. Here is a great explanation taken from Mediacollege.com of what a limiter does and how it differs from a regular compressor:
And that pretty much concludes what I’ve done to the audio signals. We will be showcasing the videos at our end of the semester showcase.
I have been a member of the SIF family now for a little more than two months, so I guess it’s about time to go through all of my projects for this semester and give you updates on each.
1) Hybrid Pedagogy Promotional Videos
This project has been a straightforward one from the beginning. The general idea is to record a series of interviews with faculty members who are experienced with a teaching that blends online and offline (i.e. in-class) activities–in other words, hybrid teaching. For this, we have come up with a set of focused interview questions, and over the course of the first 6 weeks we have conducted various interviews with faculty members. We have been able to compile a great amount of material to work with. We are currently in the post-production phase of this project, or should I say the first stage of this project since we believe that promoting hybrid teaching should also be considered from the students’ perspectives. To that end, we are planning to conduct more interviews with students in the course of the next semester in order to balance the information we have so far received from faculty. I am currently in the process of learning Adobe Premiere Pro so that I am also able to help out with the post-production process.
2) Outreach and Documenting
Similar to the project above, this one is also clearly situated in the world of promotion. The basic premise of this project is to promote places at GSU where students have the opportunity to access, use, or check out technology devices. Find out more by reading this great post from my colleague, Amber. Granted, the GSU website already provides a great amount of information regarding those places, but we came to the realization that they didn’t really showcased these spaces “in action”. So, during our early group meetings we noted all of the technology sites that are currently available at GSU, and quickly honed in on the Digital Aquarium, the Aderhold Learning Lab, and the Exchange. For each space, we had planned to shoot short, 1-minute videos that highlighted less what these spaces offer, but more how students might be able to use available devices. Unfortunately, as this idea began to take shape, we learned that each of these spaces is going do undergo major design changes, so any video we recorded would have had a pretty short life span because they would have all featured each space in its current state. That caused us to go back to the drawing board. Now, we will be focusing solely on the new CURVE space in the library in order to give GSU faculty incentives to assign activities in their classes that would make their students come to CURVE.
3) 3D World and Gaming Environment
This project is quite unique. The basic idea is to virtually re-create a city-block in Atlanta, the one where Classroom South is located to be precise, and display how this block might have looked like in the 1930s. Check out this great post by my colleague, Robert, to learn more about the virtual environment we are creating. In addition, we are planning to populate that space with objects and characters that students can interact with and learn more about the history of Atlanta. Furthermore, we also hope to have writing students create narratives and stories that further help to shape this virtual environment. Throughout the first couple of weeks into this project, I have been mostly involved with trying to consult archival sources such as photographs and newspaper articles to help our production team design the space through a gaming engine called “Unity”. We have now, however, reached out to other teams at Emory, which have also been working on a similar mapping project in order to combine our resources and see how we can help one another. My responsibility now is to facilitate that discussion and further help adding content to the virtual environment.
4) Deliberation Mapping Tool
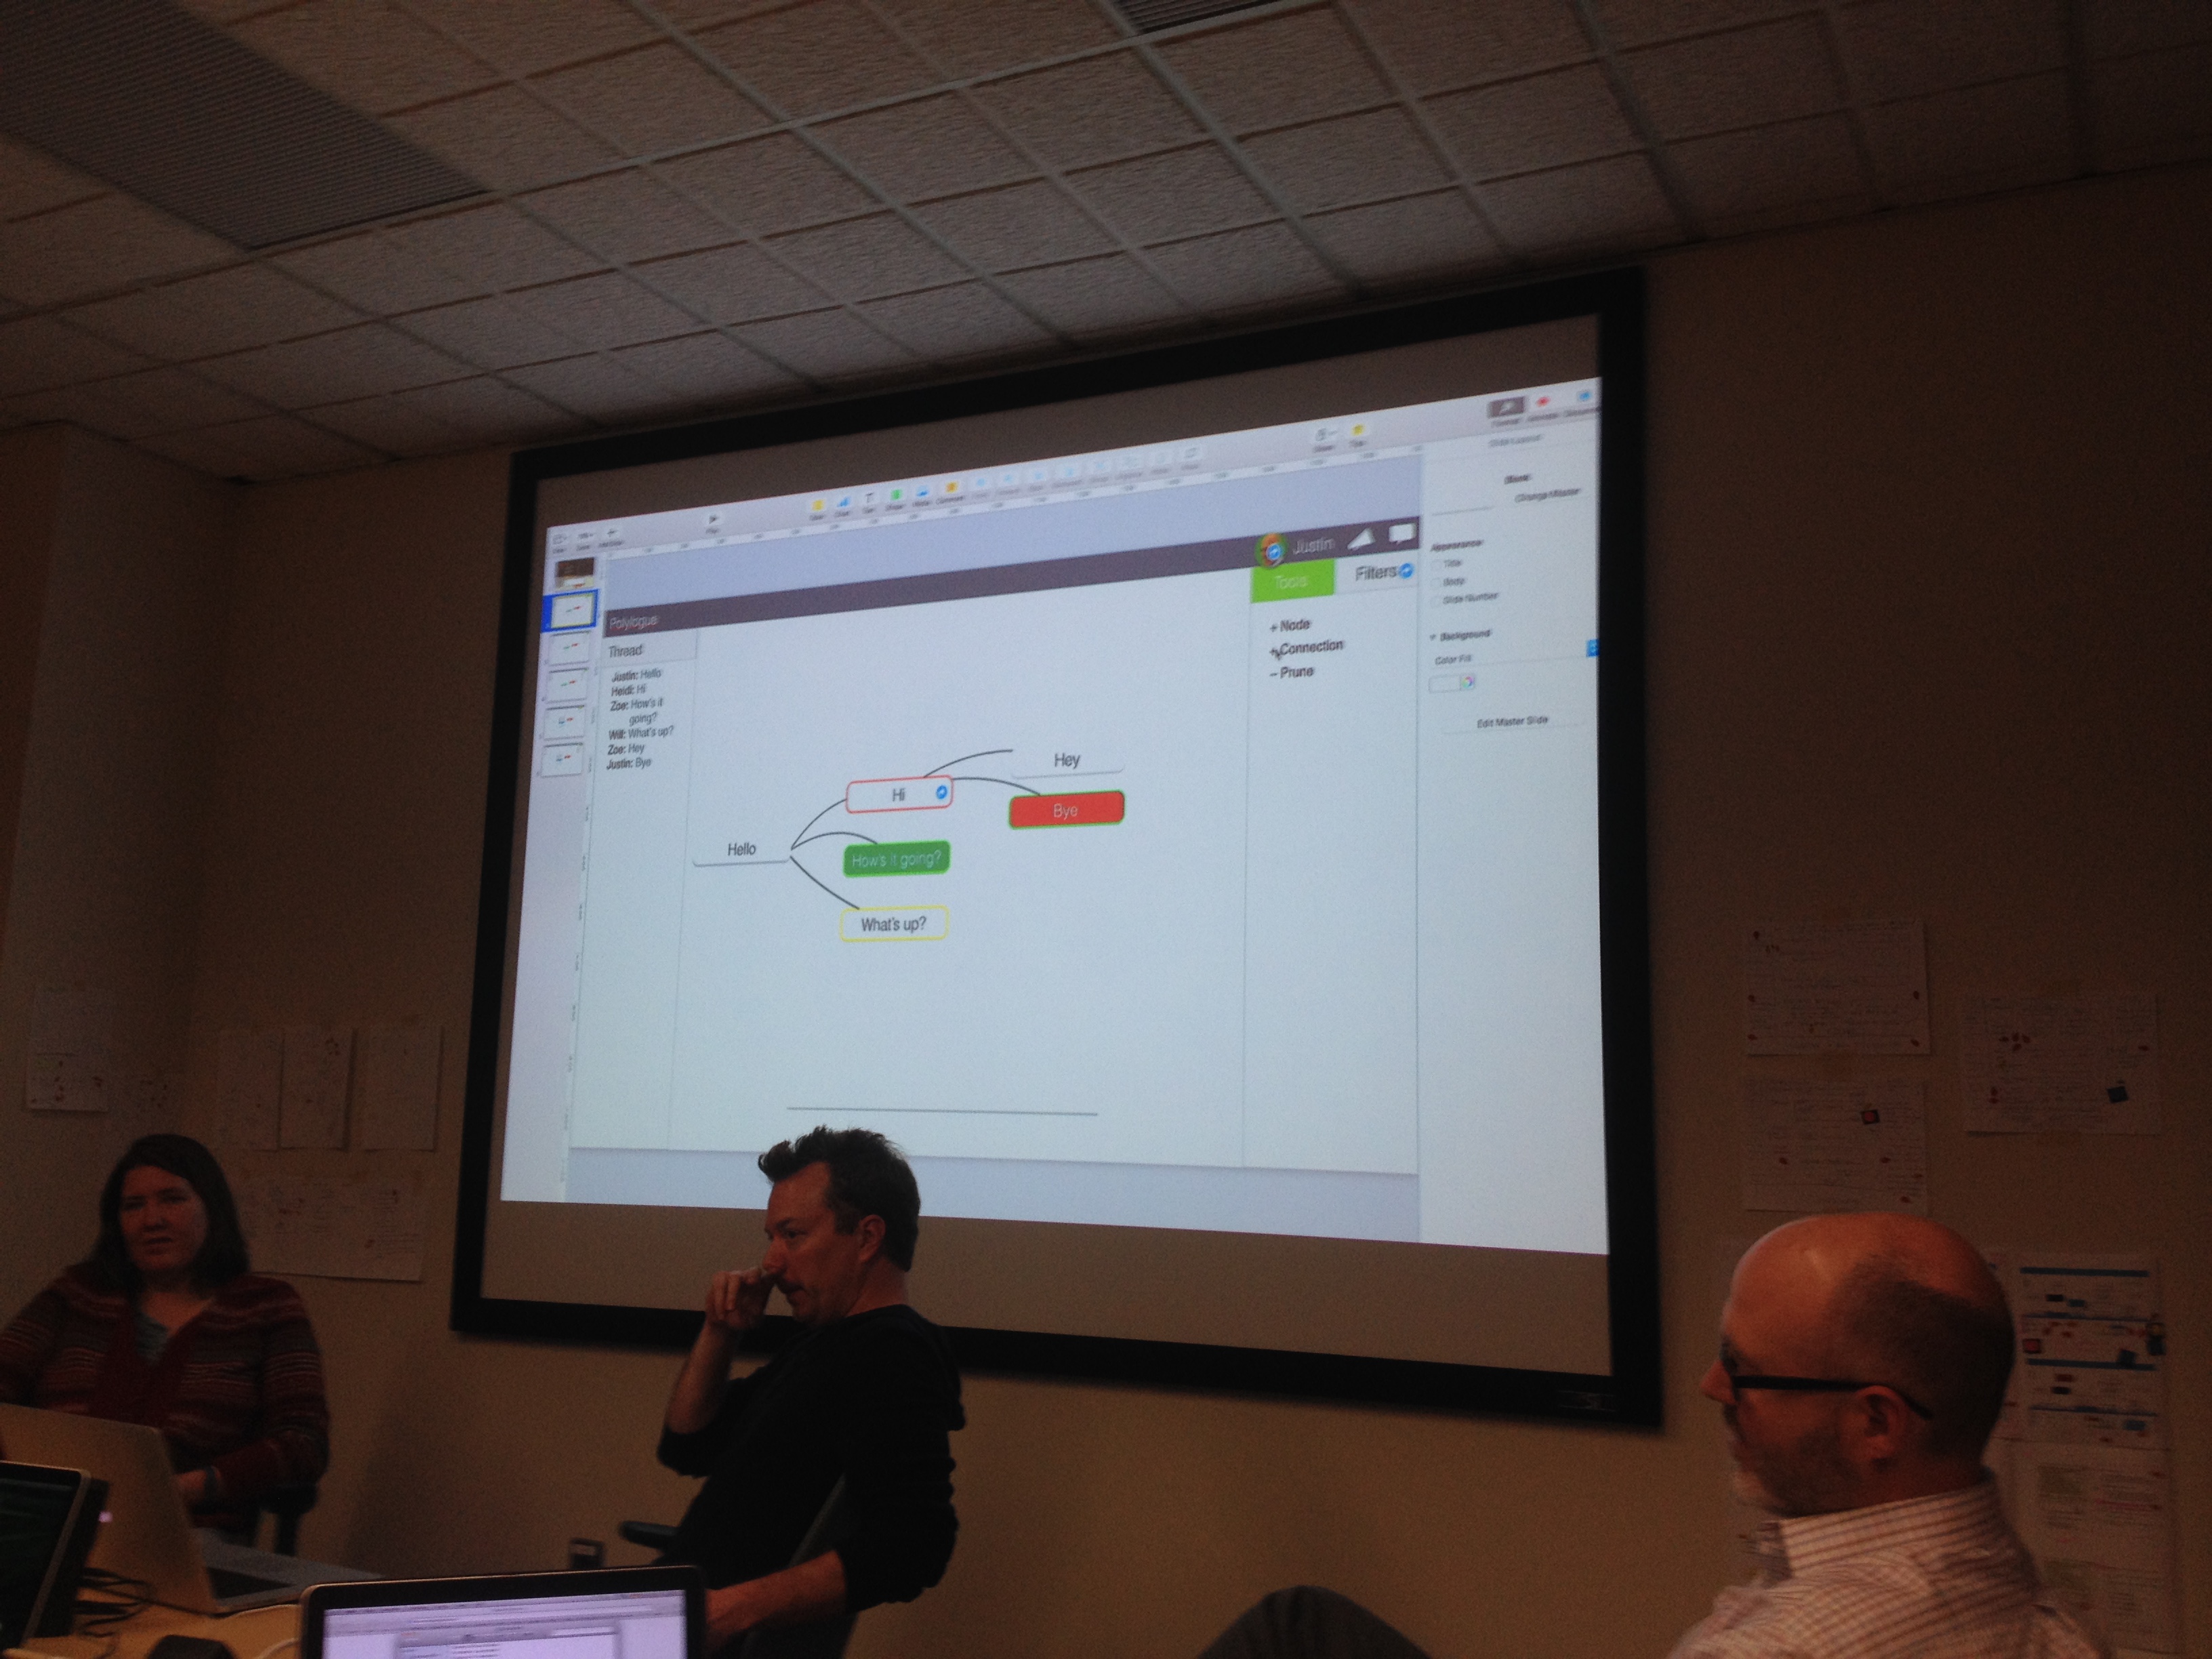
For this project, we are currently in the conceptual design stage. To give you a general idea of what this project is about, I want to refer to this great post by my SIF colleague Nathan: “Deliberation Mapping – Shaping Online Discussion“. Over the course of the last two weeks, we had some great meeting sessions, to which Siva and Ram have wrote engaging blog posts: “Integration and Finalization!!!” and “Where is the big picture?” The situation we are presently dealing with is how the different ways a user participates in a deliberation are represented visually. Below are some impressions from today’s meeting:
Justin giving directions.
Figuring out participation parameters.
At this stage, our main goal is two-fold: we need to find ways of facilitating ease of use both for students and their instructors as well as to come up with ideas on how to avoid asynchronous deliberations of becoming messy from a visual perspective.
5) Data Visualization Workshop for Research Purposes:
This is a project that emerged in the course of October. At the beginning of the semester I had been tasked with a project to create a software tool that would help a researcher visualize vocal parameters such as volume, pitch, and timber. Fortunately, I have been able to help guide the researcher to various audio production programs and tools that already offer those kinds of visualizations. So, once that project was completed, I created the “data visualization workshop” project together with Justin and Joe. The basic premise is to offer innovative ways for students and researchers to evaluate research results that they retrieve from academic databases. Oftentimes, when we access the GSU library to search for sources, we type in keywords and receive long lists of results. What if we had a way to transport those results into a visual environment and easily identify how the search relates to, let’s say, publication venues, its use in research studies over time, the kinds of disciplines that do the most research on the search term, especially when it’s a topic that is oftentimes evaluated in interdisciplinary ways. Translating my findings into a workshop was the logical conclusion. However, in order to determine the kinds of programs that are necessary to visualize database research results, I first need to identify how to best export the search results from the database. In the course of the next week, I am planning to have meetings with database experts at the GSU library regarding this issue. Once I know what’s possible, I can move further with this project.
I feel very fortunate to be part of the SIF team. I have already learned a lot and I am eager to see how all of these projects will turn out. That’s all for now.
I’m writing this blog post as a follow up to Nicole’s “Innovation and Education” post that she published on October 13. What I particularly liked about her approach to tackling the concept of innovation is that it’s not certainly necessary to “reinvent the wheel” but to take into account as many perspectives as possible when attempting to create something new.
Following this line of thinking, being innovative can be seen as doing something else with knowledge and processes already available to us. In turn, it stresses the idea that innovation always comes from “somewhere”. In few cases, innovative ideas emerge our of nothing. What I have found quite helpful in applying this logic of “somewhere” is to subscribe to as many online outlets that relate to your interests. In my case this meant subscribing to the various Youtube channels of the conference series known as TED. Below is a list of channel links:
For those of you who are not yet familiar with the organization, TED is a conference platform that works to share ideas worth spreading. This year marks its 20th anniversary with conference presentations that deal with a broad spectrum of topics and issues coming from the fields of technology, entertainment, art, education, business, and medicine. The organization curates most of those presentations on its various YouTube channel, thereby creating an impressive archive of information and knowledge. Tapping into this knowledge can really help generate ideas that we can consider innovative.
For example, this past summer I attended a TED conference in Berlin, Germany, where one of the presenters talked about a software application that helped visualize how TEDFellows were collaborating all over the world. The premise of the presentation was merely to show what the organization was doing and how the TEDFellows were fitting into the mix. Each fellow was represented as a colored dot and the collaboration between fellows was shown through curved colored lines that connected the dots. The size of each dot would, then, represent the extent to which each fellow would collaborate with others, i.e. the bigger the size the of dot, the more the fellow has been engaged in collaborative projects. Furthermore, a user could also select a fellow by clicking on the dot which would grey out most of the dots and lines and only leave those lines and dots colored that connected to the one selected.
I was blown away when I saw that. It made so much more sense than, let’s say, going through a traditional table layout and comparing mere numbers for each fellow with one another. With that software, the process of comparing relationships became a much more intuitive process. When I got back home, I went back to working on my research for my dissertation, and I started thinking: “There has to be a better of making sense of all the sources, concepts, and ideas that authors in my field of research are bringing to the table. And that’s when I thought back to that moment at TED, and I realized that visualizing research strands could be a very helpful way for me–and other researchers for that matter–to make sense of the huge amount of sources I am dealing with.
And so now I’m working towards finding easy accessible ways to get available software programs to do that very thing. Hopefully, this will all make its way into a workshop that I am going to give at GSU.
I will keep updating my progress regarding this project on the blog, but what the whole thing boils down to–echoing Nicole’s recent post–is that you don’t have to “reinvent the wheel” to do something innovative. Instead, what I suggest you do is to take advantage of what the Internet offers to all of us: access to a huge archive of knowledge. The TED channels I’ve linked above could serve as a great starting point. And if you find that TED actually interests you beyond advancing your knowledge, then I suggest you get in touch with TEDx organizers in your city. The are already a number of TEDx groups in the city of Atlanta, such as TEDxAtlanta and TEDxPeachtree, and also some affiliated with universities such as TEDxGeorgiaTech and TEDxEmory. Maybe it’s about time to thing about TEDxGeorgiaState?
This week I have been quite busy conducting interviews for my hybrid pedagogy promotion project, and one aspect that came up frequently during those interviews was my interviewee’s particular reservation against using the microblogging platform Twitter for pedagogical purposes. Most interviewees said they don’t (like to) use Twitter because it would sent their teaching into a tailspin, thereby making it more difficult to administer the students’ learning experience.
I can certainly understand the attitude. Once we go hybrid with our pedagogy, we introduce additional spaces into the learning experience and it can become quite overwhelming not only to administer the content that students produce on Twitter, but also to use that content for assessment, not to mention that in every class there will be students who don’t use social media tools at all (at least that has been my experience so far). So, from that angle, I can surely understand how Twitter can be quite intimidating at first.
However, a couple of days ago I found an email in my inbox from a research-sharing website which contained a paper on the rhetoric of hashtags by Daer, Hoffman, and Goodman, titled “Rhetorical functions of hashtag forms across social media applications,” and here I can certainly see the merit of using Twitter in the classroom for critical thinking exercises as well as for practicing analytical skills. For those of you who aren’t familiar with Twitter, hashtags are used to connect Twitter messages to larger conversations. Hashtags are words or unspaced phrases that follow the number sign (#), and they can be placed anywhere in a tweet. But beyond its ability to construct a conversation space, a hashtag can also tell users in each instance a thing or two about the contextual configuration of that space. In other words, by looking at the hashtag we can draw inferences as to whether the conversation space was created to inform, identify, entertain, critique, rally, or maybe motivate. Check out a couple of hashtags below and think about the underlying purpose of the conversation space in each case:
#geeiamsubtle
#firstworldproblems
#goodtoknow
#standyourground
#digped
For a composition class or a critical thinking class, in which questions of audience awareness and purpose are important topics of discussion, I can certainly see the benefit of using Twitter. Surely, Twitter can also teach us a thing or two about the advantages of brevity in writing, but this only goes so far. I find that Twitter would work better for analysis exercises. I imagine that an activity could be that students choose a hashtag, identify its purpose, and then analyze a set of tweets in relation to the extent to which they fulfill the purpose of the conversation space. In order to capture the tweets and turn the activity in for assessment, students could use the free webtool Storify, which allows users to collect and curate material from the internet.
I will certainly try this activity out in the future. If you think the activity is interesting, and you get a chance to do it, then please comment and let me know how it went.
Over the last week I’ve been really busy with one of my projects in particular, which is to produce a series of short videos, featuring both faculty members as well as students, that are designed to shed light on so-called hybrid approaches to teaching and learning. What does that mean? In essence, a hybrid approach to teaching and learning combines on-ground, in-class activities with online activities and discussions. Especially in the last couple of years, more and more attention has been given to this particular educational design, presumably because the explosive developments in digital information technologies and social media applications have had the effect that most of us spend more time online now than in the past. Naturally, academia doesn’t want and also shouldn’t fall behind those developments. That being said, however, there are a number of challenges that need to be considered when blending offline with online education, as put forth by Jesse Stommel, Founder and Director of Hybrid Pedagogy: A Digital Journal on Teaching & Technology:
“[The] challenge is not to merely replace (or offer substitutes for) face-to-face instruction, but to find new and innovative ways to engage students in the practice of learning. Hybrid pedagogy does not just describe an easy mixing of on-ground and online learning, but is about bringing the sorts of learning that happen in a physical place and the sorts of learning that happen in a virtual place into a more engaged and dynamic conversation.” (“Hybridity pt. 2: What is Hybrid Pedagogy?”)
So, our videos are designed to ease the process for both faculty and students to approach hybrid educational settings. And rather than putting forth a series of “how-to”-videos, we’ve decided to tackle this pedagogical concept by presenting a series of short anecdotes from experienced faculty members as well as students. I believe that a set of stories will make the whole experience much more relatable.
So much for content and context. With that being said, however, our content can only be as good as the quality of the production, particularly in terms of video and audio quality; taking those aspects into account is important because we typically find well-produced content a lot more credible. In turn, we experience bad video quality, bad audio quality, or a mix of both as distractions from the content. Even studies have shown that a video with even slightly distorted audio impedes the learning process because we need to use parts of our brain activity just to listen to the content through the distortion, similar to having to read through lots of typos in an academic paper or smudged printing of the pages.
So, below I’m going to share a few links that are not only helping me with my current project, but which will also help you when you consider creating videos for educational purposes:
Videography Tips (great general set of guidelines, including the “Seven Deadly Camcorder Sins”)
We’ve now scheduled the first interviews with faculty members willing to share their experiences. I’m very excited about the outcome, not only with regards to their stories but also when it comes to the quality of our production.
As mentioned in my first post, I also want to end my post with something valuable to share. This time I would like you to check out Lynda.com. It’s a great, subscription-based online resource with lots of tutorial videos that I’m sure you will find valuable. The platform not only features video tutorials for specialized software such as video editing programs, which I will have to wrap my head around, but you will also find a lot of great tutorials that deal with office applications such as Word, Excel, Powerpoint, or Outlook. And the great thing for us at GSU is that you can access the whole catalog for free. Just follow this link.
Consider the following everyday life situation: you’ve bought a defective item, and now you are discussing return policies with a customer service agent over the phone…then maybe you are not discussing return policies at all but you want to place an order over the phone. In any event, I dare you to ask yourself if you’ve ever wondered what the agent on the line might actually look like? I am sure that we’ve all done that at one point or the other, and I am also speculating that 9 out of 10 times our intuition would fail us and the agent on the other line doesn’t look anything like the image we crafted of him or her in our minds. Now, why might this be worth noting? The inference that we can draw is that there are certain cues embedded in the human voice which, when all we have is sound, motivate us to craft an idea of the speaker in our heads. Moreover, not only do we imagine physical attributes, we also equip the voice with certain characteristics that the speaker presumably has. Succinctly put, when we only have the sound of a voice available, we are often tempted to fill in the blanks of the speaker’s personality. And this leads us to the well-grounded assumption that the human voice is shaped by the relative relationship of various parameters such as
pitch, tone, timbre, rhythm, inflection, and emphasis among others,
which—during the act of listening—leave us with impressions about the speaker that go beyond content and context as well as the mere level of sound. The only problem is: the human voice is a fleeting thing, which makes it virtually impossible to measure and analyze the interplay between all of those parameters in real-time. Not so with pre-recorded speech, of course, which provides researchers with a potent avenue to capture and visualize the dynamic interplay of parameters that shape the human voice, and the way it is perceived.
To be honest, however, up until a week ago, that topic had never really crossed my mind. But then I had my first couple of SIF meetings, and I am now working on a project designed to find (better), more innovative ways of visualizing prerecorded voices along a set of specific parameters, enabling researchers to export parameter-related data for quantitative as well as qualitative analysis. How fascinating is that?!
I have put “better” in parentheses here for a reason because there are already quite a number of programs available that do just that.
What you see above is a screenshot I have taken with the free software, Praat (click the link to download). Whit this little tool, one can not only record mono and stereo sounds, one can also load pre-recorded sounds in order to visualize a couple of the kinds of parameters that I’ve listed above. The sound I have chosen for this example is a word, and it’s probably one of the most enigmatic utterances in cinematic history: “Rosebud” from the movie Citizen Kane (1941). The main character, Charles Foster Kane, utters this word with his last breath, and throughout the movie, audiences ponder not only the meaning of but also Kane’s relationship to the word. I don’t want to give away any spoilers because it’s such a great movie, but what I can reveal is that Kane is fond of what “Rosebud” refers to. Now, moving back to the image, what if there was a way to visualize vocal parameters in such a way as to draw relatively accurate inferences about the emotional quality of different types of utterances.
What we can visualize with Praat, first and foremost, is a waveform in the upper half, and the amplitudes here tell us something about the volume and the emphasis of the utterance. Where things become more interesting, however, is when we look at the lower half of the image. Here, we have access to visualization of certain sound-related parameters such as pitch (marked in blue) and intensity (marked in yellow). Applications like Praat are commonly used in the field of speech therapy.
Current research on sound visualization is trying to capture vocal expression on a quantitative as well as qualitative basis. Here is just one interesting paper on the topic in which the authors are “particularly interested in the paralingual (pich, rate, volume, quality, etc.), phonetic (sound content), and prosodic (rhythm, emphasis, and intonation) qualities of voice” (157): “Sonic Shapes: Visualizing Vocal Expression.”
And this is one of the projects that I’m going to work on this semester. Again, up until a week ago, those questions really hadn’t crossed my mind. But this is what it means to be a SIF fellow at Georgia State, I guess. Not only do you get to start working with a group of very smart people, you are also being confronted with new things, new questions, and new ways of seeing. And if all goes well, you eventually start looking for even newer and more exciting things yourself that you’re eager to share with others.
Speaking of sharing, I want to make it a habit of always ending a post with something worth checking out. So, if you haven’t seen Citizen Kane, yet, then by all means, do so!