Instructing students to set up a blog is simpler to do in class online however the basic approach is very similar. Despite general expectations of the technological literacy of today’s students, setting up a blog sometimes proves to be surprisingly overwhelming. Unfortunately, when we assume that they will be okay without our active support we often alienate those who are unprepared. Students are frequently embarrassed when they lack the digital know-how of their peers and will resist asking questions so it’s best to proceed with a ground-up approach if you don’t want to deal with excessive requests for assistance outside of class when getting started.
The following instruction have been refined over several semesters and seem to be fairly successful with assisting students in their independent set up. The instruction can also be used as a guideline when demonstrating how to set up a blog in class.
Feel free to copy and paste these instructions as a new html document in iCollege and alter to suit your needs. Images can be saved individually.
Step 1: Start by visiting http://sites.gsu.edu/
As a GSU student, you already have a blog waiting for you – you just have to activate it to get started. You can set up a PERSONAL blog by simply logging in with your current GSU username and password.
Step 2: Check out the additional Getting Started Information available from GSU (links under “Class Blogging” are NOT intended for you, only for teachers).
The options provided on the log-in page, in combination with the Getting Started information provided in the link above, should be more than enough to get you started AND should be used as your primary reference when learning about your personal blog. The information below is provided as a supplemental resource to help you progress through this section quickly.
When you log in you will be taken to the Dashboard (seen below) where you’ll then be able to navigate all of your blogging options, change the appearance of your blog, upload an avatar, add your instructor as an administrator, and eventually create and upload all of your class blog assignments.
Step 3: Navigating your Dashboard
Note: Your dashboard will have messages and titles that are different from the images below – these are simply used as a reference to help you gain a better visual understanding of how to find things in your blog after logging in.
On the left of your screen there will be a list of optional tabs: Dashboard is always at the top and is sort of like your blogs “homepage”. Below that you’ll be able to locate sources for Posts, Pages, Comments, Appearance, Users, Settings, etc.

Step 4: ADD your Instructor as an User/Administrator (Very IMPORTANT!)
You are required to add your instructor as an administrator to your blog – this will enable them to take control of your blog should you have some kind of major issue. As an administrator your instructor will be able to actively see what you see and make necessary changes if warranted (and at your request). This does not give them access to your password information but it will allow them to check your post and comment history for grading purposes if required.
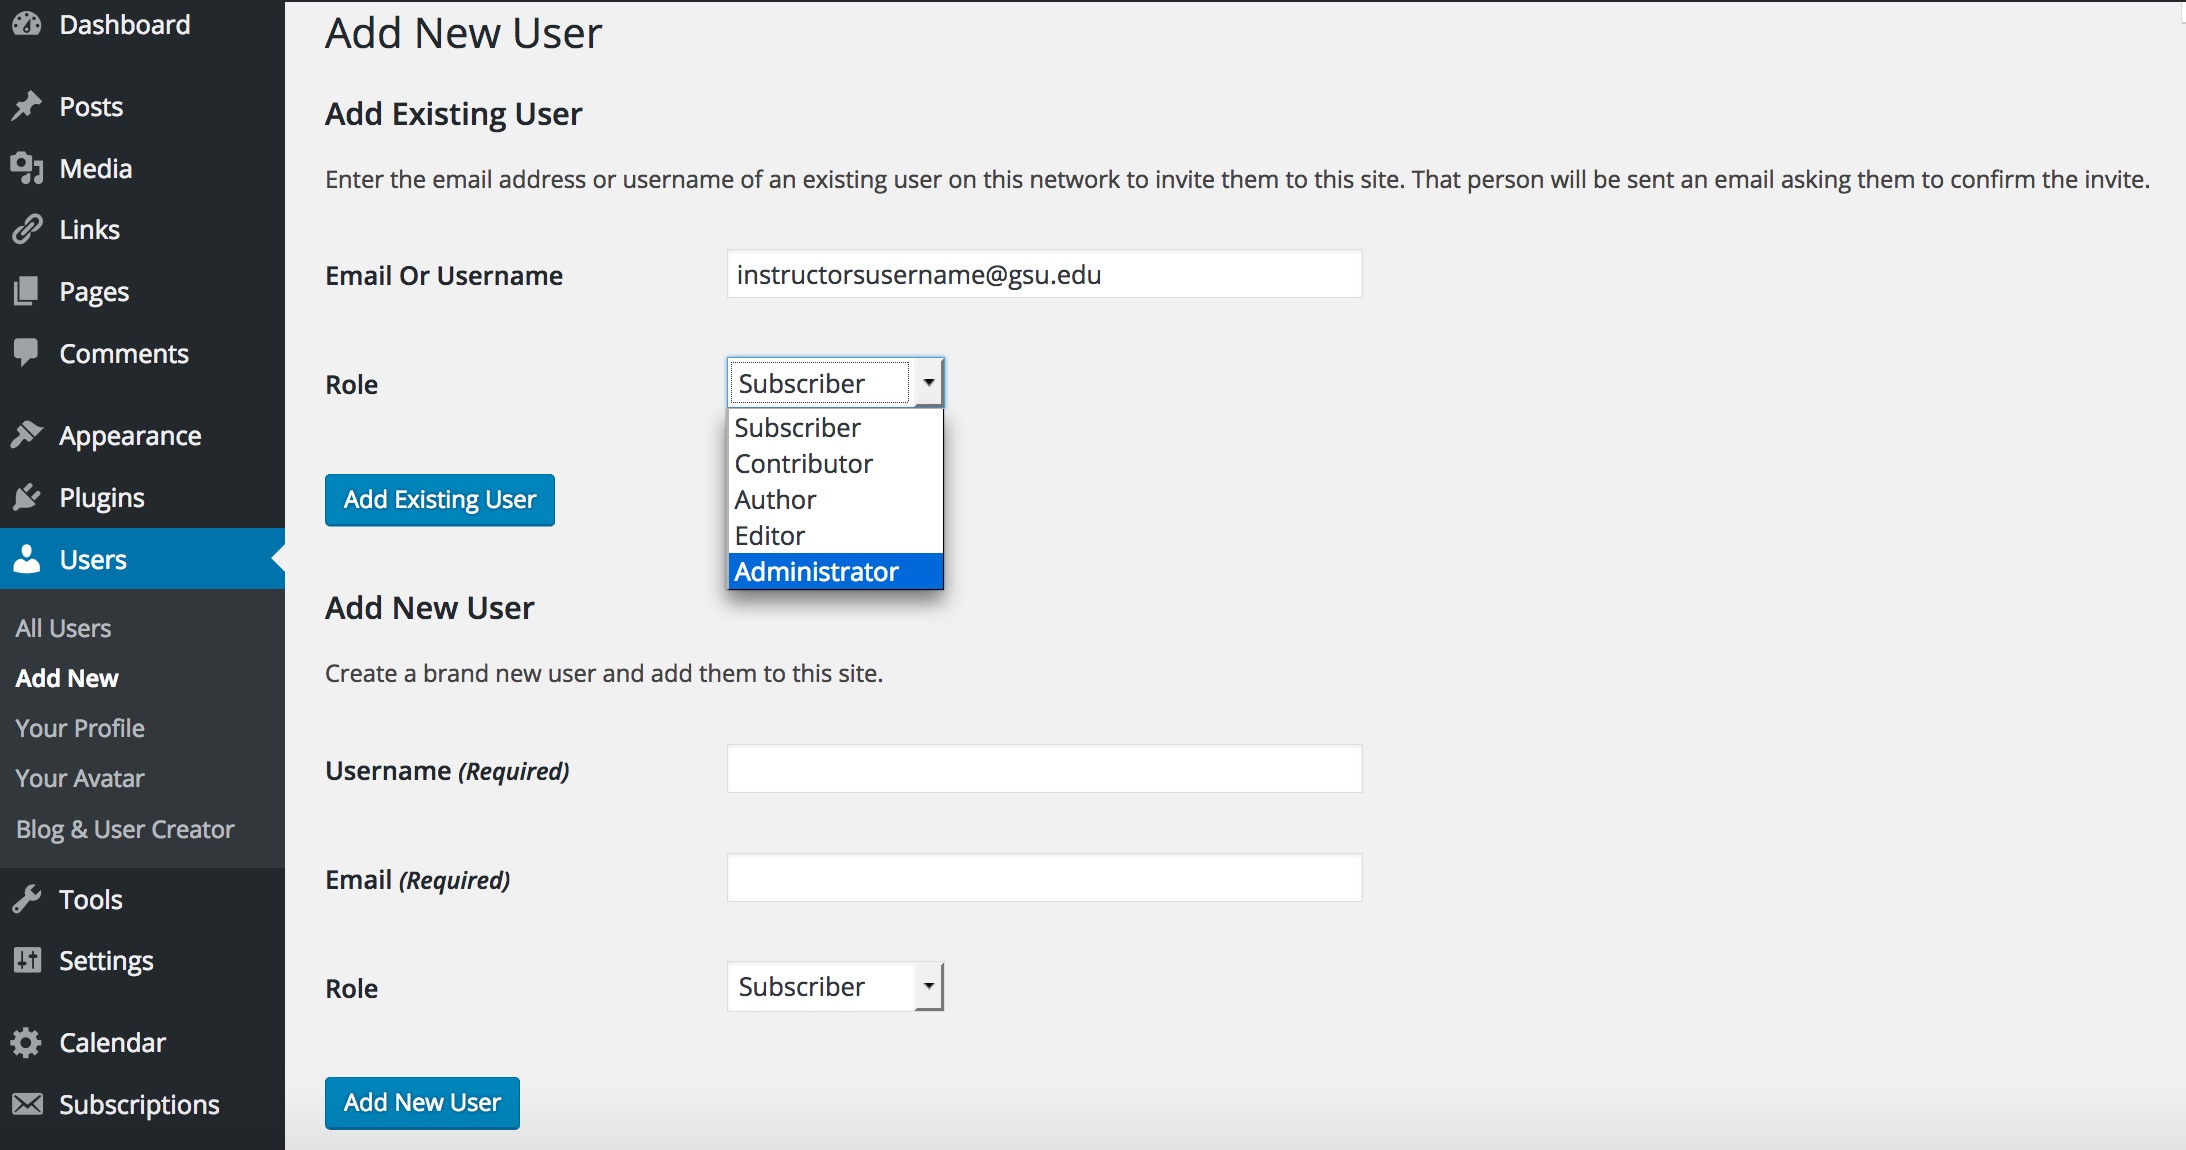
In your Dashboard, go to the Users menu in the sidebar. In the Add Existing User section enter your instructors GSU email address: ___________ Select Administrator under the Role menu. If this does not work, try adding them by using their username ____________. Select Add Existing User.

Adding your instructor as an administrator will also share your new blog address with them – a very important bit of information if you’d like to earn a grade for your assignments!
Step 5: Scroll down until you see Appearance. Select Themes.
Select a Theme that you like and which reflects your personality. It’s a good idea to choose a theme that is “mobile friendly” since many of your classmates will frequently be viewing your content from a mobile device. There are a large variety of themes to choose from (over 200!):

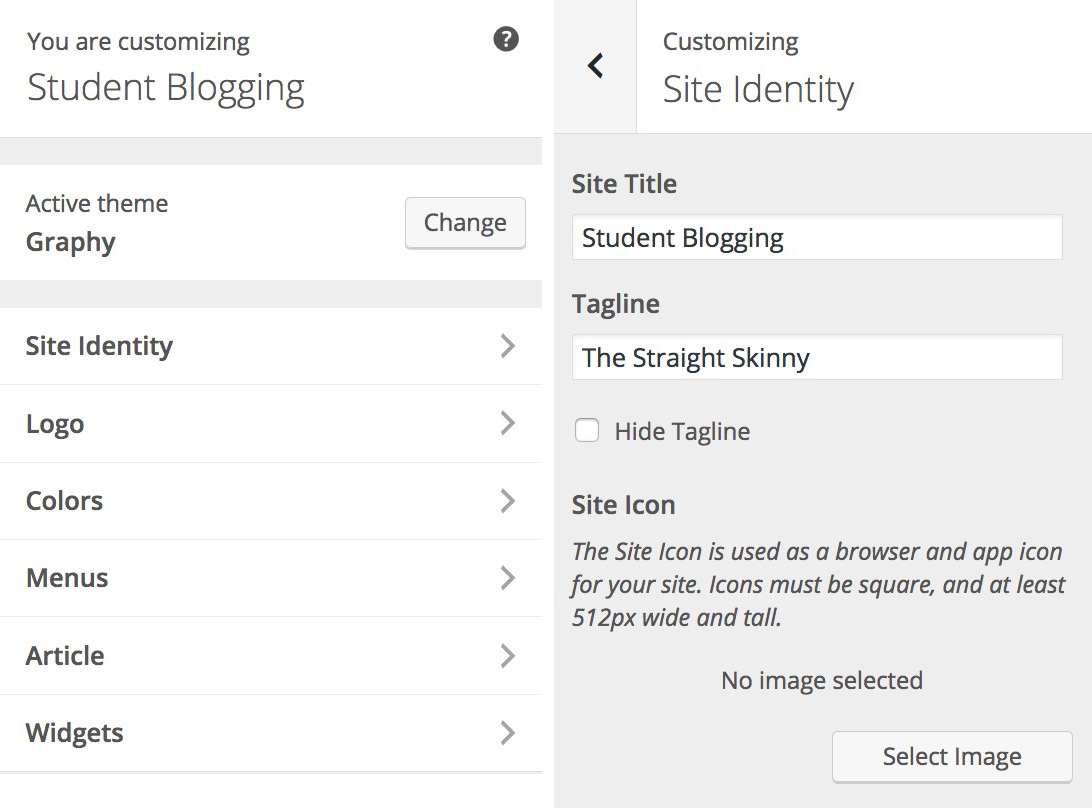
Step 6: Now go back to the Appearance tab and select Customize.
In the Customize options your will be able to change the title of your blog. You can also customize the colors and images that are more prominently displayed on your blog, design menus and add widgets (like a search menu or a link to your Instagram, etc.), and also change your active theme at any time.
- When customizing your blog, it’s important to change your blog title under Site Identity,
You must use your name in the title of your blog! This is important because your classmates and professor want to easily find your blog when necessary. You can choose to use only your first or last name if you wish, however, at least include a last initial if only using your first name. If you go by a different name than what is listed on the class roster (i.e. GoSolar/PAWS) please include your legal name in some was as well. For example “Missy’s Blog (Tanka)” instead of “Michelle Tanka’s Blog” etc. Your tagline can be whatever you want it to be.
Step 7: Consider the options that you provide on the front page of your blog.
- Changing your time zone:
There are a couple of other customization options that are important (or at least helpful). One is setting the time zone for your blog – this is especially important if you’re not in the EST time zone.
To do this, go to Settings in your Dashboard. Select the General tab in the menu and review the Timezone listed for your blog. Alter the time to reflect the current time in Atlanta (which is the Eastern-Standard-Timezone). You are expected to submit assignments by the deadline listed in iCollege according to the EST timezone.

Another thing that you should consider is adding a subscription option for your classmates and instructor. This is not required. By reviewing the options in the Widget menu under Appearance you can add the Subscribe by Email option to the front page of your site (providing that your theme permits this – most do).
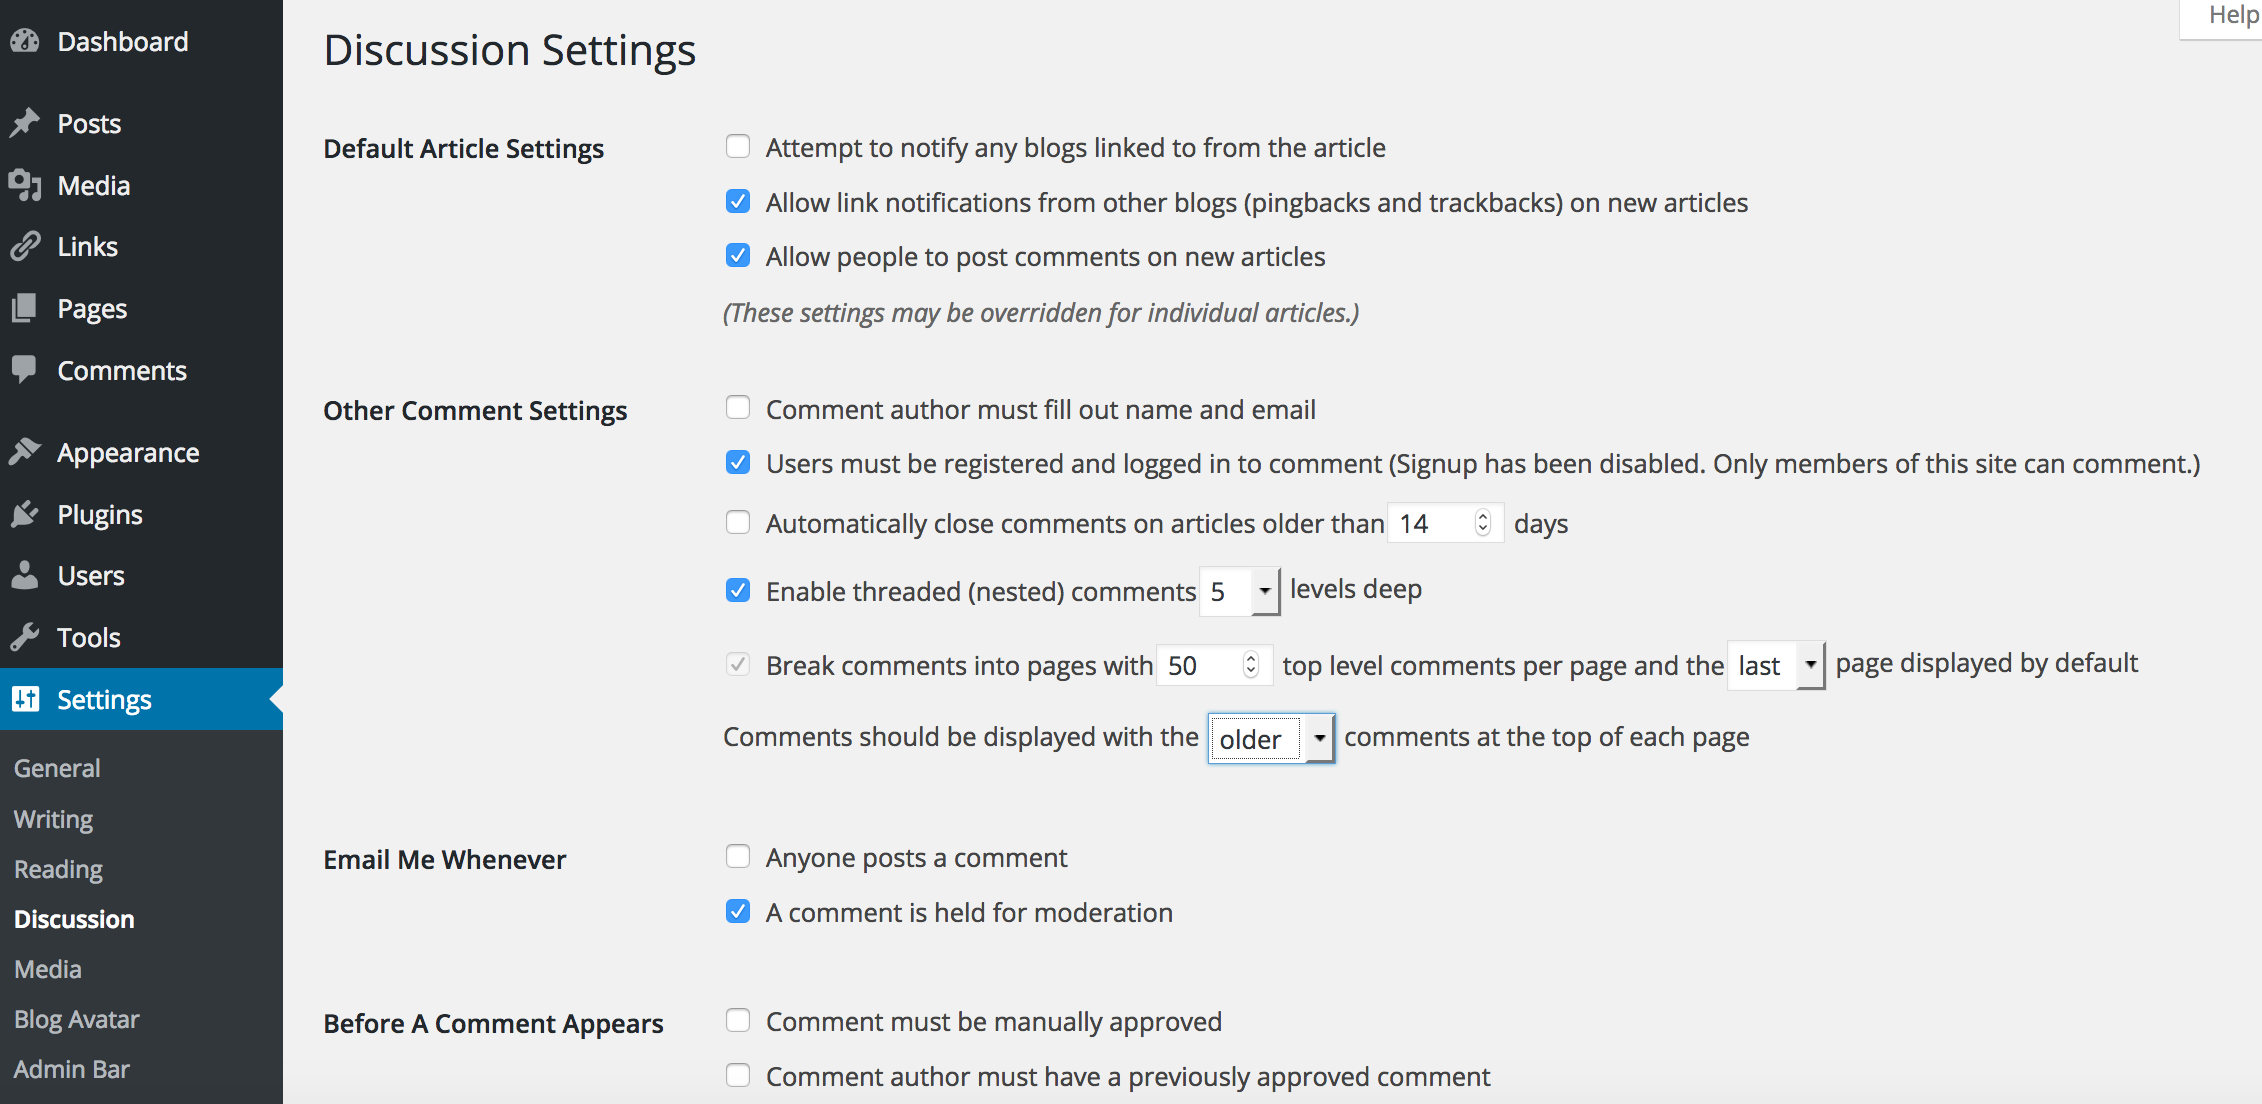
- Arrange for auto approval of comments:
IMPORTANT!!! Make sure that you go into your blog and approve comments frequently so that they appear visibly on your blog – your classmates will become very frustrated if you do not approve their comments regularly because – until you do – they can’t make sure that they’ve completed their own objectives correctly.
Would you like to have all of your comments automatically approved? Start by going to Settings –> Discussions and then scrolling down to the section on “Before a Comment Appears” and deselect each of the boxes. If you do this, all comments will automatically be posted to your blog.
And now the rest is up to you – you’re welcome to customize your blog in any way and to make it your own.
Still have questions? Contact the instructor.